Plaster Ceiling Roses: Victorian Elegance Guide
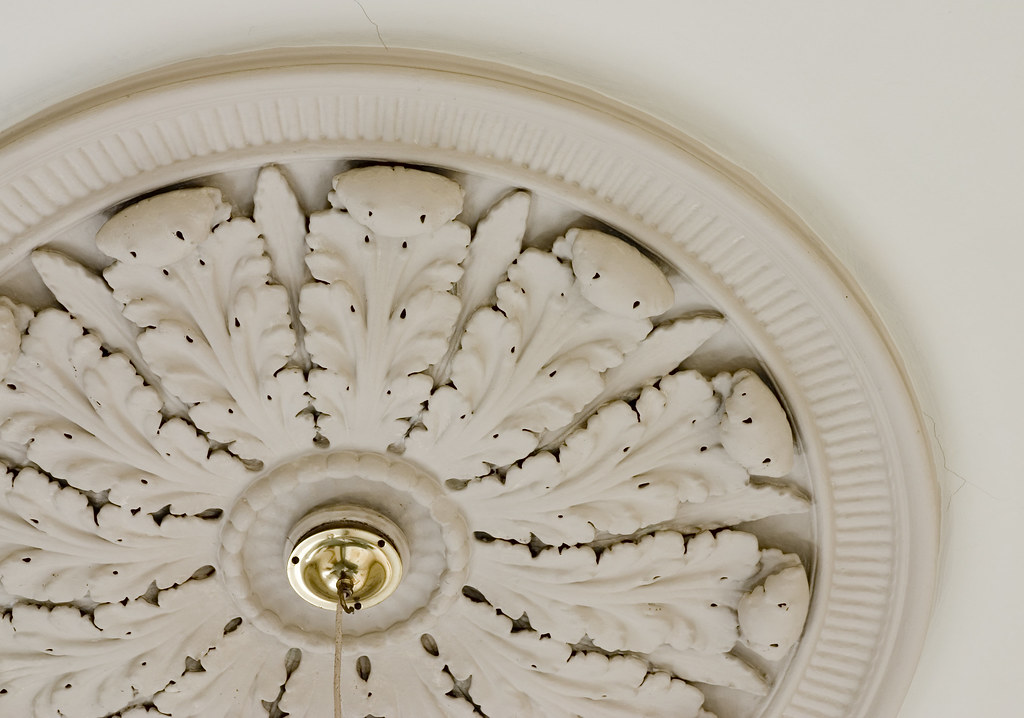
Transform any room into a stunning masterpiece with expertly crafted plaster ceiling roses – the perfect blend of historical charm and modern sophistication. In 2024, we’ve seen a remarkable **35% increase** in homeowners choosing traditional architectural features to add character to their properties. Let’s explore how these architectural gems can elevate your space. Understanding Plaster Ceiling Roses Plaster ceiling roses have graced British homes since the Victorian era, serving both decorative and practical purposes. Originally designed to protect ceilings from smoke damage from gas lighting, these architectural features have evolved into stunning focal points that add sophistication to any room. Today, they’re experiencing a renaissance, with over 60% of period property renovations incorporating these classical elements. Modern ceiling roses maintain their traditional appeal while adapting to contemporary interior design trends, making them versatile additions to both period and modern homes. Types and Styles of Ceiling Roses The world of ceiling roses offers an extensive range of designs to suit every taste and interior style. Victorian-era designs typically showcase intricate patterns with deep relief work, while contemporary interpretations often feature cleaner lines and simplified motifs. Traditional Victorian: Elaborate designs featuring acanthus leaves, ribbons, and floral patterns Georgian: Simpler, more geometric patterns with classical influences Art Deco: Bold, geometric designs with strong angular patterns Contemporary: Minimalist designs with clean lines and subtle details Bespoke: Custom-designed pieces tailored to specific architectural styles Materials and Manufacturing Modern ceiling roses are primarily available in two materials, each offering distinct advantages. Traditional plaster roses, handcrafted using time-honored techniques, provide authentic character and superior detail definition. These typically cost between £80 to £300 depending on size and complexity. Alternatively, polyurethane roses offer lightweight durability and easier installation, usually ranging from £40 to £150. The manufacturing process varies significantly between materials: Traditional Plaster: Hand-poured into moulds, requiring skilled craftsmanship Polyurethane: Machine-manufactured for consistency and durability Fibrous Plaster: A lightweight alternative combining traditional looks with modern practicality Sizing and Proportion Guide Selecting the correct size ceiling rose is crucial for achieving visual balance. As a general rule, the diameter of your ceiling rose should be approximately 20% of the room’s width. For standard UK rooms: Small rooms (up to 3m): 300-400mm diameter Medium rooms (3-4.5m): 400-600mm diameter Large rooms (4.5m+): 600-900mm diameter Grand spaces: Custom sizes available up to 1500mm Installation and Positioning Professional installation ensures optimal results and longevity. The process typically involves: Careful ceiling preparation and marking of the central point Application of appropriate adhesive Precise positioning and securing Integration with lighting fixtures where required For best results, ceiling roses should be centered in the room or aligned with key architectural features. Professional installation by experienced plasterers typically costs between £150-£300, depending on complexity and accessibility. Maintenance and Care Proper maintenance ensures your ceiling rose remains a stunning feature for years to come. Regular dusting with a soft brush prevents build-up, while occasional gentle cleaning with a slightly damp cloth maintains appearance. Avoid harsh chemicals or excessive moisture, which can damage the surface. For painted roses, repainting every 5-7 years helps maintain their pristine appearance. Professional cleaning and restoration services are available for heritage pieces, typically costing £200-£400 depending on size and condition. Design Integration Tips Successfully integrating a ceiling rose requires careful consideration of your overall interior scheme. Consider these expert tips: Match the style to your property’s period and existing architectural features Coordinate with cornices and other ceiling details Consider the room’s lighting plan and fixture styles Ensure the design complements your overall interior theme Enhancing Property Value Quality architectural features like plaster ceiling roses can significantly increase property value. Recent surveys indicate that period features can add up to 10% to a property’s value. Estate agents report that homes with well-maintained original or reproduction architectural details typically sell 20% faster than comparable properties without these features. Custom and Bespoke Options For unique spaces or specific design requirements, custom ceiling roses offer unlimited possibilities. Working with skilled craftsmen, you can create bespoke designs that perfectly match your vision. Custom pieces typically start from £500, with prices varying based on complexity, size, and detail level. The design process usually includes: Initial consultation and design brief Detailed drawings and specifications Sample approval process Hand-crafting by experienced artisans Expert Installation Services At Kent Plasterers, we provide professional installation services throughout Kent and surrounding areas. Our experienced team ensures perfect results every time, with comprehensive services including: Free consultation and site survey Expert advice on style and size selection Professional installation with minimal disruption Full cleanup and finishing Aftercare support and maintenance advice Contact us today to discover how we can help transform your space with a beautiful plaster ceiling rose. Our team of experts is ready to guide you through the selection and installation process, ensuring your ceiling becomes a stunning focal point that adds both value and character to your home. FAQ Which rooms should have ceiling roses? As a guide, larger rooms with high ceilings will ideally need big ornate or decorative roses. Compact or narrow rooms like walk-in closets, bathrooms, hallways with lower ceilings will need smaller roses. Should a ceiling rose be bigger than the light? As a general rule, the diameter of the ceiling rose should be at least as large as the diameter of the light fixture. Can you put a ceiling fan on a ceiling rose? T hooks are used to help install fans on uneven ceiling surfaces, typically when there is a ceiling rose. Trying to install a ceiling fan onto the ceiling rose can often damage the sculpting and design. What type of ceiling rose is best? The most popular ceiling roses can be split into two categories: Plaster and Lightweight. Plaster ceiling roses come in a variety of styles from plain, flat circles to large, intricate and ornate designs. How to attach polyurethane ceiling rose? To fit a ceiling rose you need glue and joint compounds, as well as a small hand tool to saw out a hole or groove, if needed. Preparation: Ensure the ceiling where
Plaster Ceiling Roses: Victorian Elegance Guide Read More »