Tools & Equipment

Plaster Beading and Trims: Types, Uses and Installation

Plaster Beading and Trims: Types, Uses and Installation

Quick Answer: Plaster beading and trims are metal or plastic profiles that reinforce external corners, create clean edges, and provide professional finishing details in plastering work. The most common types include angle beads (for external corners), stop beads (for creating clean plaster edges), bellcast beads (for render), and architrave beads (for reveals around windows and doors). Proper installation involves fixing the bead securely to the substrate, checking for plumb and level, then plastering over it to create a crisp, protected edge that will last for decades. Why Plaster Beading Matters: The Foundation of Professional Finishing Walk into any professionally plastered room and run your hand along the external corners, around door frames, or where plaster meets different surfaces. You’ll find crisp, straight edges that hold their shape year after year. That’s not down to exceptional trowel skills alone — it’s the result of properly installed plaster beading. Without beading, external corners are vulnerable to impact damage, plaster edges can crumble over time, and achieving consistently straight lines becomes a matter of skill and luck rather than guaranteed precision. In 2026, with Building Regulations demanding higher standards and homeowners expecting perfect finishes, understanding plaster trims isn’t optional — it’s fundamental. Whether you’re a tradesman looking to improve your technique or a homeowner trying to understand what you’re paying for, this guide covers everything you need to know about selecting, installing, and finishing plaster beading correctly. Types of Plaster Beading: The Complete Reference The plastering industry uses a surprising variety of beading profiles, each designed for specific applications. Here’s the comprehensive breakdown: Angle Bead (External Corner Bead) Angle bead is the most commonly used trim in plastering. It protects and reinforces external corners — those 90-degree edges where two walls meet on the outside of the corner. Standard galvanised steel angle bead: The workhorse of the industry, typically 2.4m or 3m lengths, costs £1.20-£2.50 per length from suppliers like Screwfix or Travis Perkins Stainless steel angle bead: For wet areas or coastal properties where corrosion is a concern, costs around £4-£6 per length PVC angle bead: Flexible plastic version that won’t rust, useful for slight curves or renovation work, £2-£3.50 per length Thin coat angle bead: Designed for 2-3mm skim applications, has a narrower wing than standard beads Expanded wing angle bead: Features perforated wings for better key with plaster, ideal for professional installations The nose (the corner edge itself) is typically 3mm thick on standard beads, creating a small radius rather than a sharp 90-degree angle. This prevents the corner from chipping and provides better impact resistance. Stop Bead (Plaster Stop) Stop bead creates a clean, defined edge where plastering terminates. Unlike angle bead which turns a corner, stop bead simply ends the plaster in a straight line. Standard stop bead: 13mm depth for two-coat work, £1.80-£3 per 2.4m length Thin coat stop bead: 3mm depth for skim-only applications Movement stop bead: Features a flexible section to accommodate differential movement between substrates You’ll use stop beads where plaster meets timber, at the edge of plasterboard before tiling, or where you’re plastering only part of a wall. They’re essential for creating professional transitions between materials. Bellcast Bead Bellcast bead is designed for external render applications, creating a drip edge that throws water clear of the wall below. The profile features an outward curve (the “bell”) that prevents water from tracking back under the render. According to British Gypsum’s technical guidance, bellcast beads should be installed at the base of rendered walls, above DPC level, to protect the wall from water ingress. In 2026, with increased focus on building envelope performance, proper bellcast installation is more critical than ever. Architrave Bead (Reveal Bead) Architrave beads create clean, straight edges around window and door reveals. They replace the traditional method of forming edges with a wooden rule, saving time and ensuring consistency. Available in depths from 6mm to 32mm to match various frame positions Typically cost £3-£5 per 2.4m length The return leg sits behind the window or door frame, while the visible edge creates the plaster line Casing Bead Casing bead (also called shadow bead or reveal bead) creates a recessed shadow line where plaster meets another surface. Unlike stop bead which sits flush, casing bead creates a deliberate gap — typically 3-6mm — for aesthetic effect. Modern interior design increasingly favours these clean shadow gaps over traditional architraves, making casing bead more popular in 2026 than ever before. It’s particularly effective around door openings in minimalist schemes. Expansion Bead (Movement Bead) Expansion beads accommodate movement between different substrates or large plastered areas. They feature a flexible PVC section that compresses and expands without cracking the plaster. British Standard BS 5492:2022 requires movement joints in large plastered areas and at junctions between different materials. In practice, you’ll use expansion beads: Where blockwork meets timber frame construction In large ceiling areas exceeding 15m in any direction At junctions between wet and dry areas (bathroom to bedroom walls) Where underfloor heating creates differential movement Mesh Bead and Tear-Away Bead Mesh bead incorporates a fibreglass mesh wing for reinforcing plaster edges at weak points. Tear-away bead features a removable plastic edge that creates ultra-sharp arris corners — you plaster over it, then strip away the plastic face once dry. Tear-away beads cost £4-£7 per length but create exhibition-quality corners. They’re worth considering for high-end residential work or feature walls where perfection matters. Bead Type Primary Use Typical Depth Cost per 2.4m (2026) Angle Bead (steel) External corners 10-13mm £1.20-£2.50 Angle Bead (PVC) External corners (flexible) 10-13mm £2.00-£3.50 Stop Bead Plaster termination 3-13mm £1.80-£3.00 Bellcast Bead External render base 15-20mm £3.50-£5.00 Architrave Bead Window/door reveals 6-32mm £3.00-£5.00 Casing Bead Shadow gap details 6-13mm £2.50-£4.00 Expansion Bead Movement joints 10-13mm £4.00-£6.50 Tear-Away Bead Ultra-sharp corners 12.5mm £4.00-£7.00 Choosing the Right Bead: Material and Application Selecting the appropriate bead isn’t just about the profile — the material matters enormously for longevity and performance. Galvanised Steel vs Stainless Steel Galvanised steel angle bead remains the industry standard for internal

Plaster Beading and Trims: Types, Uses and Installation Read More »

Spot Boards, Buckets and Baths: Plastering Prep Equipment

Spot Boards, Buckets and Baths: Plastering Prep Equipment

Quick Answer: The three essential plastering prep tools are spot boards (for holding plaster near the work area), mixing buckets (typically 25L for gauging small batches), and mixing baths (100-150L for larger jobs). A proper spot board should be 600-900mm square with a sturdy handle underneath, buckets need measurement markings, and baths require a flat base for stability. Quality prep equipment costs £80-150 but lasts years and dramatically improves efficiency. Why Plastering Prep Equipment Matters More Than You Think Walk onto any professional plastering job, and you’ll notice experienced tradesmen spend as much time setting up their prep equipment as they do actually applying plaster. That’s no coincidence. The difference between a smooth, efficient plastering job and a frustrating shambles often comes down to having the right mixing and material handling equipment. A proper spot board keeps your mixed plaster at the perfect working height, a correctly sized mixing bucket ensures consistent gauging, and a sturdy mixing bath lets you prepare enough material to maintain your rhythm without constant interruptions. In this guide, we’ll cover everything you need to know about selecting, using, and maintaining the prep equipment that professional plasterers rely on daily. Whether you’re a DIY enthusiast tackling your first room or a trainee plasterer assembling your kit, understanding these fundamentals will save you time, money, and considerable frustration. Spot Boards: Your Plaster’s Home Base A spot board (sometimes called a hawk board or banker board) is a flat platform that holds your working plaster within arm’s reach. It’s one of those tools that seems unnecessarily old-fashioned until you try plastering without one — then you’ll understand why plasterers have used them for centuries. What Makes a Good Spot Board The ideal spot board has several critical characteristics: Size: Between 600mm and 900mm square — large enough to hold a decent quantity of plaster, but not so large it’s awkward to position Material: Marine ply or exterior-grade plywood (18-25mm thick) that won’t warp when wet Surface: Smooth and sealed with diluted PVA or marine varnish for easy cleaning Handle: A robust batten underneath (50mm x 100mm minimum) for carrying and positioning Height adjustment: Adjustable stands (typically 600-900mm) to position the board at a comfortable working height Professional plasterers often have multiple spot boards — one for bonding coat applications and another kept pristine for skim work. The reasoning is simple: even tiny particles of set bonding plaster contaminating your finishing plaster can cause scratches and imperfections. Pro Tip: Position your spot board perpendicular to the wall you’re plastering, about 400-600mm away. This keeps it close enough for efficient working but far enough that you won’t knock it with your trowel or accidentally step back into it. DIY vs. Professional Spot Boards Type Cost Pros Cons DIY Plywood Board £20-35 Customisable size, low cost, easy to replace Requires construction, may warp without proper sealing Manufactured Plastic Board (Refina, Marshalltown) £45-65 Lightweight, won’t warp, extremely easy to clean Can crack if dropped, more expensive Professional Plywood with Stand £80-120 Durable, adjustable height, stable on uneven floors Higher initial cost, heavier to transport Most professionals prefer a marine ply board on an adjustable metal stand. The weight provides stability, and the height adjustment means you can position the board at lower back height (typically 800-850mm), reducing strain during long plastering sessions. Maintaining Your Spot Board A well-maintained spot board can last 5-10 years with daily professional use. Follow these practices: Clean immediately after each use — never let plaster dry on the surface Use a damp sponge rather than scraping, which damages the sealed surface Re-seal the surface annually with diluted PVA (3 parts water to 1 part PVA) Store horizontally to prevent warping Check the handle fixings regularly — loose handles are a common cause of plaster spillage Mixing Buckets: Getting the Gauging Right Plastering buckets serve dual purposes: measuring water accurately and mixing small batches of plaster when you don’t need a full bath. The standard UK plastering bucket is 25 litres, though you’ll also see 12L (for patching) and occasionally 15L buckets. Essential Features of a Plastering Bucket Volume markings are non-negotiable. When you’re gauging finishing plaster, the ratio matters immensely — typically 11.5 litres of water per 25kg bag of British Gypsum Multi-Finish, according to the manufacturer’s technical guidance. Eyeballing this leads to inconsistent results. Look for these characteristics in a quality plastering bucket: Graduated markings embossed or moulded into the plastic (printed markings wear off) Heavy-duty plastic construction (minimum 2mm wall thickness) to withstand mixer abuse Reinforced rim — the top edge takes significant impact from mixing paddles Flat base for stability during hand mixing or when using a paddle mixer Comfortable handle that can support a full bucket (25L of water weighs 25kg) ⚠️ Warning: Never use decorating buckets for mixing plaster. They’re too thin-walled and will split when using a paddle mixer. Purpose-made plastering buckets from suppliers like Wickes or Screwfix cost £6-12 and are built to withstand the torque from mixing equipment. Bucket Organisation on Site Professional plasterers typically keep a minimum of four buckets on any job: Fresh water bucket: For mixing and rinsing tools between coats Dirty water bucket: For initial tool cleaning (prevents contaminating fresh water) Mixing bucket: The working bucket for gauging plaster Spare bucket: For emergencies, tool storage, or if a bucket cracks This might seem excessive to a DIYer, but contamination is the enemy of good plastering. A few grains of set plaster in your fresh mix can cause scratches and imperfections that ruin your finish. Mixing Baths: Scaling Up for Larger Jobs Once you’re plastering walls rather than just patching, a mixing bath becomes essential. These large, shallow containers (typically 100-150 litres) allow you to mix multiple bags of plaster at once, maintaining a consistent working rhythm. Choosing the Right Size Bath Bath sizes correlate directly to the scope of work you’re undertaking: Bath Size Typical Capacity Suitable For Price Range Small (100L) 2-3 bags of plaster Single rooms, patch work, solo plasterers £35-55 Medium

Spot Boards, Buckets and Baths: Plastering Prep Equipment Read More »

Plaster wall plugs: How to choose and use them correctly

Plaster wall plugs are essential for secure fixings, but choosing the wrong type can lead to crumbling walls and failed installations. Whether you’re hanging a heavy mirror, mounting a TV bracket, or installing kitchen cabinets, selecting the appropriate wall plug for your plaster surface makes all the difference between a professional finish and a costly disaster. TL;DR – Quick Summary Plaster wall plugs must match your wall type: solid plaster requires different fixings than hollow plasterboard Universal options like Fischer Duopower work across multiple surfaces, whilst specialist plasterboard fixings provide superior holding power in hollow walls Weight capacity varies dramatically: the same plug can hold 10kg in plasterboard but 15kg in solid walls Correct installation technique prevents common failures including spinning plugs, crumbling plaster, and collapsed fixings Matching drill bit size, plug diameter, and screw specifications is essential for secure, long-lasting installations Understanding Plaster Wall Plugs: Why They Matter Wall plugs serve a critical function in any fixing project, transforming smooth plaster surfaces into secure anchor points for screws. Without them, screws would simply spin uselessly in the relatively soft plaster material, unable to grip or support any meaningful weight. The plug expands within the drilled hole, creating friction and mechanical grip that holds both the plug and screw firmly in place. The distinction between solid plaster walls and hollow plasterboard is fundamental to choosing the right fixing. Solid plaster walls, typically found in older properties, consist of dense material applied directly over masonry or lath. These walls can support substantial weight when the correct plug penetrates into the masonry behind. Hollow plasterboard walls, common in modern construction, feature a thin gypsum board fixed to timber or metal studs with a void behind. Using the wrong type of plaster wall plugs creates numerous problems that range from irritating to dangerous. In solid walls, plasterboard-specific fixings won’t expand properly and will simply pull out under load. In hollow walls, standard expansion plugs designed for masonry will crush through the plasterboard surface, leaving unsightly damage and no holding power whatsoever. The result is fallen pictures, collapsed shelving, and expensive repairs to damaged plasterwork. Types of Plaster Wall Plugs and Their Applications Universal Plugs for Versatile Use The Fischer Duopower wall plugs 6mm x 30mm nylon represent an excellent all-rounder for both hollow and solid walls. These intelligent fixings automatically adapt to the surface they encounter, expanding differently depending on whether they meet void or masonry. They suit 4-5 x 35mm screws and can support up to 10kg in plasterboard or 15kg in solid walls, making them ideal for medium-weight applications like bathroom accessories or kitchen wall cabinets. For heavier applications, the Fischer Duopower 8mm x 40mm nylon variant offers increased capacity across both wall types. These require a 6mm drill bit and should be tapped in with a hammer before inserting the screw. The larger diameter provides superior holding power, particularly important when fixing items like radiators or heavy mirrors where failure simply isn’t acceptable. The Rawl-4-All 8mm x 40mm nylon plugs offer remarkable versatility, suitable for plasterboard and brick alike. Compatible with 4.5-6 x 40-260mm screws, these fixings accommodate an impressive range of screw lengths, making them particularly useful for installations where the fixing must pass through additional materials like wooden battens or metal brackets before engaging with the wall. Plasterboard-Specific Fixings Fischer plasterboard specific 6mm x 35mm nylon plugs are engineered exclusively for hollow walls, providing optimised performance where universal plugs might compromise. Designed for 4 x 35mm screws, these dedicated plasterboard fixings feature mechanisms that spread the load across a wider area of the fragile plasterboard material, reducing the risk of crushing or breakthrough. Multi-size plastic plugs with depth gauge offer a user-friendly solution for varying plasterboard thicknesses. Using a 7mm bit, these clever fixings feature legs that expand behind the plasterboard once pushed through, creating a secure anchor point. They’re specifically designed for 50mm thick walls and require screws at least 4.5mm wide to ensure proper engagement with the expanding mechanism. The Rawlplug Uno 7mm x 30mm plastic fixings bring anti-rotation technology to plasterboard, concrete, and brick applications. Suitable for 4-6 x 25-80mm screws, these plugs feature special ribs or wings that prevent the plug spinning in the hole during screw insertion. This anti-rotation feature proves invaluable when working overhead or in awkward positions where holding the plug steady would otherwise be challenging. Heavy-Duty Options for Demanding Applications Toggle bolts with wings represent the gold standard for heavy loads in hollow plasterboard walls. Installation requires drilling a large hole with a flat wood bit, threading the cord through, then pushing the collapsed wings through the hole. Once behind the plasterboard, spring-loaded wings open and grab the back surface, distributing weight across a substantial area. These excel for heavy mirrors, wall-mounted televisions, and substantial shelving units. Butterfly expansion plugs available in 50 sets with matching screws provide an economical solution for multiple fixing points. Popular for TV brackets and similar hollow drywall applications, these durable, high-quality fixings feature wings that expand as the screw tightens, pulling the fixture firmly against the wall surface whilst the wings brace against the back of the plasterboard. The HTB 2-1/4 inch drywall anchor bolt with slotted head comes top-rated for plaster hollow walls, available in professional 100-packs. These substantial fixings provide exceptional holding power and feature a slotted head design that allows for precise adjustment and removal if necessary. Their size and construction make them particularly suitable for commercial installations where reliability and load capacity are paramount. How to Choose the Right Plaster Wall Plug for Your Project Assessing Your Wall Type The simple knock test reveals wall construction instantly. Tap firmly on the wall surface with your knuckles. A solid, dull thud indicates solid plaster over masonry, whilst a hollow, resonant sound reveals plasterboard over a cavity. This basic test should be your first step before selecting any fixing type. Wall thickness matters significantly, particularly with plasterboard installations. Standard plasterboard is typically 12.5mm thick, but modern insulated walls may feature 50mm

Plaster wall plugs: How to choose and use them correctly Read More »

Best Mixing Drills for Plaster: Reviews and Buying Guide

Quick Answer: The best mixing drills for plaster in 2026 are the Refina MX1800 (professional choice, £220-280), Belle Promix 1600E (budget-friendly, £140-180), and Erbauer ERB722MXT from Screwfix (DIY option, £80-110). Look for 1,400W+ power, variable speed control (0-600 RPM), M14 thread paddle compatibility, and two-handed operation. Professionals should expect to spend £150-300 for a drill that’ll last 5+ years of daily site work. Why Your Mixing Drill Matters More Than You Think I’ve seen countless plasterers struggle with mixing, and nine times out of ten, it’s down to using the wrong drill. A standard combi drill simply won’t cut it when you’re mixing 25kg bags of Multi-Finish all day long. The right mixing drill transforms your workflow. It saves your arms, delivers consistent mixes with no lumps, and crucially, doesn’t burn out after six months like those cheap alternatives from the car boot sale. In this comprehensive guide, I’ll walk you through everything you need to know about choosing a plaster mixing drill that’ll actually earn its keep on site. We’ll cover the technical specs that matter, review the best models available in 2026, and share professional tips I’ve learned from 20+ years in the trade. What Makes a Good Plaster Mixing Drill? Not all mixing drills are created equal. Here’s what separates the professionals from the pretenders: Power Output: The Non-Negotiable Minimum For plastering work, you need minimum 1,400W of power. Anything less and you’ll struggle with thicker mixes, particularly when working with base coats like Hardwall or Browning. Professional plasterers typically opt for 1,600W to 1,800W models. Yes, they’re heavier, but the extra torque means you’re not fighting the drill when mixing 75-litre tubs of material. 1,200W-1,400W: Suitable for occasional DIY work, thin skim coats only 1,400W-1,600W: Entry-level professional use, handles most plaster types 1,600W-1,800W: Professional standard, daily site work, all plaster types 1,800W+: Heavy-duty commercial work, render, screed mixing Variable Speed Control This isn’t a luxury feature — it’s essential. Starting a paddle mixer at full speed in a bucket of plaster is a recipe for covering yourself (and the client’s new kitchen) in spray. Look for models with electronic speed control ranging from 0-600 RPM. The trigger sensitivity matters too; you want smooth, progressive acceleration, not an on/off switch. Two-Handed Operation and Stability Single-handed mixing drills belong in the bin. The torque generated by a proper paddle mixer will twist your wrist if you’re only gripping with one hand. Quality models feature either a D-handle or loop handle configuration. The D-handle offers better control for smaller batches, while the loop handle provides superior stability when mixing large volumes. Pro Tip: Always plant your feet shoulder-width apart and engage your core when mixing. Let the drill do the work — if you’re straining, you either need more power or a better mixing technique. M14 Thread Compatibility The paddle attachment thread matters more than most realise. M14 thread is the industry standard in the UK, giving you access to the widest range of professional mixing paddles. Some budget drills use proprietary fittings or smaller threads. This limits your paddle options and makes replacements harder to source from trade counters. Thermal Overload Protection Mixing plaster generates significant heat in the motor. Without thermal overload protection, your drill will burn out during extended mixing sessions. This feature automatically cuts power when the motor reaches critical temperature, then resets once it’s cooled. It’s the difference between a drill lasting two years versus ten. Best Mixing Drills for Plaster: 2026 Reviews After extensive testing and consultation with plasterers across Kent, here are the top performers currently available: 1. Refina MX1800 — Best Professional Choice The Refina MX1800 remains the gold standard for professional plasterers. This 1,800W powerhouse handles everything from finish plasters to thick base coats without breaking a sweat. Specification Details Power 1,800W Speed Range 0-650 RPM variable Weight 4.8kg Thread M14 Handle Type Ergonomic loop handle Price (2026) £220-280 Strengths: Exceptional build quality, smooth variable speed control, superior thermal management. The soft-start feature prevents material splash, and the lock-on button is perfect for extended mixing sessions. Weaknesses: Premium price point. Heavier than some competitors, which can fatigue arms during all-day use. Best for: Professional plasterers working full-time, contractors needing reliability for daily site work. 2. Belle Promix 1600E — Best Value Professional The Belle Promix 1600E offers 90% of the Refina’s performance at roughly 65% of the price. It’s become increasingly popular with self-employed plasterers watching their overheads. Specification Details Power 1,600W Speed Range 0-600 RPM variable Weight 4.2kg Thread M14 Handle Type D-handle with side grip Price (2026) £140-180 Strengths: Excellent price-to-performance ratio, lighter than premium models, robust construction. The 1,600W motor handles all standard plastering work comfortably. Weaknesses: Speed control isn’t quite as refined as the Refina. The trigger can feel slightly jerky at low speeds until you get used to it. Best for: Self-employed plasterers, small crews, those wanting professional performance without premium pricing. 3. Erbauer ERB722MXT (Screwfix) — Best Budget Option Screwfix’s own-brand Erbauer has impressed many plasterers with its 1,600W offering. It’s not built for decade-long daily abuse, but for occasional professional use or serious DIY work, it’s hard to fault at this price point. Specification Details Power 1,600W Speed Range 0-580 RPM variable Weight 3.9kg Thread M14 Handle Type Loop handle Price (2026) £80-110 Strengths: Outstanding value, readily available from any Screwfix branch, surprisingly capable for the money. Good for plasterers just starting out who can’t justify £200+ on a drill yet. Weaknesses: Build quality doesn’t match premium brands. Some users report the speed dial becoming loose after 12-18 months of heavy use. Not designed for all-day, every-day commercial work. Best for: DIY enthusiasts, plasterers starting their business, occasional professional use, backup drill for established plasterers. 4. Makita UT1600 — Premium Alternative Makita’s reputation for reliability extends to their mixing drills. The UT1600 sits between the Belle and Refina in both price and performance. Specification Details Power 1,600W Speed Range 0-600 RPM variable Weight 4.3kg Thread M14 Handle Type Loop handle with soft

Best Mixing Drills for Plaster: Reviews and Buying Guide Read More »

Plastering Hawks and Boards: How to Choose and Use

Quick Answer: A plastering hawk (or hand board) is an essential tool that holds plaster while you work, typically a flat aluminium or plastic square (270-330mm) with a handle underneath. Combined with a trowel, it’s the fundamental duo for applying plaster efficiently. Quality hawks cost £12-£35, with professional-grade aluminium models from brands like Refina and Marshalltown being the gold standard. The hawk keeps plaster at arm’s reach, reduces trips to your mixing bucket, and allows single-handed operation whilst maintaining a smooth workflow. What Is a Plastering Hawk and Why Do You Need One? A plastering hawk is a flat, square board with a perpendicular handle fixed to its underside. You hold it in your non-dominant hand whilst working with a trowel in your dominant hand. It’s fundamentally a portable plaster platform that sits just below your working area. The hawk serves several critical functions that make it indispensable on any plastering job: Plaster reservoir: Holds 1-2kg of mixed plaster at a time, reducing constant trips to your bucket Single-handed operation: Frees up your trowel hand to work continuously without interruption Workflow efficiency: Positioned at the perfect angle for loading your trowel quickly Material control: Prevents plaster from drying out too quickly compared to leaving it in a bucket Professional technique: Essential for proper hawk-and-trowel methodology taught in CITB plastering qualifications Without a hawk, you’d need to constantly bend to your bucket, breaking your rhythm and creating an inefficient, physically draining workflow. Professional plasterers can work for hours using proper hawk technique, whereas beginners without one tire quickly and produce inconsistent results. Types of Plastering Hawks: Materials and Designs Not all hawks are created equal. The material, size, and construction directly impact durability, weight, and performance. Here’s what’s available in 2026: Aluminium Hawks (Professional Standard) Aluminium hawks are the industry standard used by 90% of professional plasterers across the UK. They offer the optimal balance of lightweight construction and durability. Key characteristics: Weight: 400-600g (light enough for all-day use) Standard sizes: 280mm, 300mm, 330mm square Price range: £18-£35 for quality models Lifespan: 5-10+ years with proper care Surface: Smooth aluminium that won’t rust or corrode Premium brands include Refina, Marshalltown, and OX Tools. These feature properly welded handles, bevelled edges to prevent plaster build-up, and perfectly flat surfaces. You’ll find them at Screwfix, Toolstation, and specialist trade suppliers. Plastic Hawks (Budget Option) Plastic hawks cost £8-£15 and work adequately for DIY projects or occasional use. However, they have significant drawbacks for professional work: Flexibility issues: Can warp or flex when loaded with heavy plaster Durability concerns: Handles can snap under repeated stress Surface texture: Some plastics allow plaster to stick more than aluminium Limited lifespan: Typically 1-2 years for regular users Plastic hawks suit homeowners doing a single room or apprentices learning basic technique before investing in professional tools. Wooden Hawks (Traditional but Obsolete) Traditional wooden hawks were standard until the 1980s but are now rare. Wood absorbs moisture, warps over time, and requires maintenance (sanding and sealing). Most professionals abandoned them decades ago, though some heritage restoration specialists still use them for authenticity on listed building projects. Specialist Hawks Several niche variations exist for specific applications: Type Description Use Case Price Range Rendering Hawk Larger (350-400mm), heavier construction External rendering, holding more material £25-£45 Corner Hawk 90° angled design Internal/external corner work £22-£35 Lightweight Hawk Thin aluminium (300-400g) Ceiling work, reduced arm fatigue £20-£30 Magnetic Hawk Integrated magnets for tool storage Holding trowels whilst loading hawk £28-£40 Choosing the Right Size Hawk Size matters significantly when selecting a hawk. The wrong size causes arm fatigue, inefficient plaster management, or difficulty maneuvering in tight spaces. Standard Sizing Guide 280mm (11″): Ideal for small rooms, bathrooms, tight spaces. Lighter and easier for beginners or those with smaller builds. Holds approximately 1-1.5kg of plaster. 300mm (12″): The most popular all-rounder size. Suitable for 90% of domestic plastering work. Holds 1.5-2kg comfortably. Recommended for most tradespeople. 330mm (13″): Preferred by experienced plasterers on larger jobs. Holds 2-2.5kg. Requires stronger arm and wrist strength but maximizes efficiency on big walls. Most professionals own multiple sizes, selecting based on the specific job. A bathroom plastering project might suit a 280mm hawk, whilst a large lounge calls for a 330mm. Pro Tip: Your hawk size should match your physical build and the typical room sizes you work in. If you’re 5’6″ and work mainly in standard UK terraced houses, a 300mm hawk is perfect. If you’re 6’2″ doing new-build estates, consider a 330mm for efficiency. Start with a 300mm if unsure—it’s the Goldilocks size that works for almost everything. Plastering Hawks vs. Spot Boards: Understanding the Difference Beginners often confuse hawks with spot boards, but they serve completely different functions in the plastering workflow. Spot boards are larger flat boards (typically 600-900mm square) placed on a stand at waist height. They hold your bulk plaster supply—the bucket of mixed material you’re working from. You load your hawk from the spot board, not directly from the mixing bucket. Hawks are handheld, holding only the small amount of plaster you’re actively applying at that moment. The professional workflow looks like this: Mix plaster in bucket using a plastering whisk and drill Transfer mixed plaster to spot board on stand Load hawk from spot board (2-3 trowel loads) Apply from hawk to wall using trowel Return to spot board when hawk is empty This system keeps your working material at the perfect height and consistency, prevents contamination, and creates an efficient production line. How to Hold and Use a Plastering Hawk Properly Proper hawk technique is fundamental to plastering efficiency and quality. Poor technique causes arm fatigue, dropped plaster, and inconsistent application. The Correct Grip Hold the hawk handle with your non-dominant hand, fingers wrapped around the handle with your thumb on top. Your hand should be in a natural, relaxed position—not gripping tightly. Key positioning elements: Hawk tilted at approximately 30-45° angle toward your body Positioned at chest to shoulder height for optimal loading Elbow bent at roughly

Plastering Hawks and Boards: How to Choose and Use Read More »

Best Plastering Trowels Reviewed: Top Picks for 2026

Quick Answer: The best plastering trowels in 2026 are the Marshalltown M23D (£45-55) for professionals demanding precision, the Nela Premium Flex (£50-65) for superior flexibility and control, and the Ragni R6114SS (£25-35) for excellent value. Your choice depends on your experience level, budget, and plastering style. Carbon steel trowels suit traditional work, whilst stainless steel offers easier cleaning and longer lifespan. Why Your Trowel Choice Matters More Than You Think Ask any experienced plasterer what makes the difference between an acceptable finish and a flawless one, and they’ll tell you it’s not just skill—it’s the tools. The plastering trowel is the extension of your hand, the instrument that translates years of experience into perfectly smooth walls. I’ve spent over fifteen years in the trade, and I can tell you that a £15 budget trowel from a market stall will cost you far more in frustration, time, and poor finishes than investing in quality kit. The right trowel responds to pressure, holds its edge, flexes just enough during the trowelling-up process, and feels balanced in your hand after eight hours on site. This comprehensive review covers the top plastering trowels available in the UK in 2026, comparing materials, sizes, flex characteristics, and real-world performance. Whether you’re a professional plasterer upgrading your kit or a keen DIYer tackling your first skim coat, this guide will help you make an informed choice. Understanding Trowel Specifications: What Actually Matters Before diving into specific product reviews, let’s establish what separates a professional-grade trowel from a DIY-level tool. Understanding these specifications will help you evaluate any trowel you consider. Blade Material: Carbon Steel vs Stainless Steel Carbon steel trowels are the traditional choice. They’re typically more affordable (£20-45) and offer excellent stiffness for applying base coats. The blade “breaks in” over time, developing a slight flex that many experienced plasterers prefer. However, carbon steel requires maintenance—it must be cleaned immediately after use and occasionally oiled to prevent rust. Stainless steel trowels have become increasingly popular since 2024, particularly the Swedish or German-made varieties. They cost more (£40-70) but offer significant advantages: Virtually rust-proof, even if left wet overnight (though you shouldn’t) Easier to clean—plaster slides off more readily Longer lifespan with consistent performance Better for gypsum-based finishes like Thistle Multi Finish Maintains sharp, clean edges throughout its working life Pro Tip: If you’re doing primarily finishing work (skim coats), invest in stainless steel. If you regularly apply thick base coats of sand and cement render, a carbon steel trowel’s extra rigidity might serve you better. Trowel Dimensions and Their Applications Plastering trowels typically range from 11″ to 16″ in length. Here’s how size affects performance: Size Best For Characteristics 11″ Patch repairs, awkward spaces, beginners More control, less fatigue, easier to manoeuvre 13″ All-round work, medium walls, finishing coats Balanced size, versatile for most applications 14″ Professional finishing, large wall areas Industry standard, optimal coverage and control 16″ Experienced professionals, large commercial sites Maximum coverage, requires strength and experience Most professional plasterers keep a 14″ trowel for main work and an 11″ or 13″ for detailed areas. If you’re just starting out or only need one trowel, a 13″ offers the best compromise between control and coverage. Blade Flex: The Secret to Professional Finishes The amount of flex in a trowel blade significantly affects your finishing technique. A blade with moderate flex (often called “medium flex” or “premium flex”) allows you to apply varying pressure across the blade’s surface, creating that perfectly flat finish without trowel lines. Pre-broken or broken-in trowels are becoming more common. Manufacturers like Nela and Refina now pre-treat blades to provide optimal flex from day one, eliminating the traditional breaking-in period that could take weeks of use. Top 6 Plastering Trowels for 2026: Detailed Reviews After extensive testing and consultation with professional plasterers across Kent and the Southeast, here are the standout trowels currently available in the UK market. 1. Marshalltown M23D DuraSoft Finishing Trowel (£45-55) The Marshalltown M23D remains the gold standard against which all other trowels are measured. This American-made trowel features a high-carbon steel blade that’s been the choice of professional plasterers for over four decades. Key specifications: Available in 11″, 13″, 14″, and 16″ lengths High-carbon steel blade, hardened and tempered DuraSoft handle with finger guard Golden stainless steel mounting for durability Blade thickness: 0.8mm for optimal flex The DuraSoft handle is genuinely comfortable during extended use—I’ve spent full days skim-coating with this trowel without the hand fatigue you get from cheaper alternatives. The blade holds its edge exceptionally well, maintaining sharp corners that are essential for internal angles and edges. The M23D does require proper maintenance. Clean it thoroughly after each use, dry it completely, and apply a light oil coating if storing for more than a few days. Treat it right, and it’ll last fifteen years or more. Best for: Professional plasterers, serious DIYers, anyone prioritising longevity and consistent performance. Available from Screwfix and specialist plastering suppliers. 2. Nela Premium Flex Finishing Trowel (£50-65) Nela trowels have gained a massive following among UK plasterers since around 2019, and the Premium Flex model shows why. This Swedish stainless steel trowel offers exceptional build quality and comes pre-broken, ready for professional finishing work straight from the box. Key specifications: Premium Swedish stainless steel blade Pre-broken flex for immediate optimal performance Soft-grip, ergonomic handle Available in 13″, 14″, and 16″ Rounded corners reduce snagging What sets the Nela apart is the blade flex consistency. Where carbon steel trowels develop flex over time (and can become unpredictable), the Nela maintains the same flex characteristics throughout its life. This is particularly valuable when working with modern gypsum finishes that require precise trowelling technique. The stainless steel construction means cleanup is effortless—plaster literally slides off under running water. For professionals doing multiple rooms daily, this time-saving alone justifies the higher price point. Best for: Professionals seeking the ultimate finishing tool, anyone working primarily with gypsum-based plasters, those who value easy maintenance. Pro Tip: Nela trowels work exceptionally well with finishing plaster

Best Plastering Trowels Reviewed: Top Picks for 2026 Read More »

Essential Plastering Tools: The Complete Kit List for 2026

Quick Answer: A professional plasterer’s kit in 2026 costs between £350-£800 for quality tools that will last years. Essential items include hawks (£15-35), trowels (£20-60 each), mixing paddle and drill (£80-150), buckets, floats, scrapers, and safety equipment. Brands like Marshalltown, Refina, and Faithfull dominate the UK market. Beginners can start with a basic kit around £200-300, but investing in proper equipment from the outset saves money and produces better results. Why the Right Plastering Tools Make All the Difference After thirty years in the trade, I’ve seen countless DIY enthusiasts and apprentice plasterers struggle with cheap tools that make good work nearly impossible. The difference between a £15 budget trowel from a car boot sale and a properly balanced Marshalltown isn’t just comfort—it’s the quality of finish you can achieve. Professional plastering demands precision tools that respond to your movements. A quality hawk and trowel combination becomes an extension of your arm, allowing you to achieve that mirror-smooth finish on a skim coat. Poor tools create drag marks, uneven surfaces, and wrist fatigue that compounds over hours of work. This comprehensive guide covers everything you need in your plastering toolkit for 2026, from essential basics to specialist equipment. Whether you’re learning plastering fundamentals or upgrading your professional kit, you’ll find specific product recommendations, current UK pricing, and the insider knowledge that only comes from years on site. The Essential Core Kit: What Every Plasterer Needs Before investing in specialist tools, you need the fundamentals. These are the non-negotiables that you’ll use on virtually every job, from small patch repairs to full room skims. Trowels: Your Most Important Investment The plastering trowel is your primary tool—the one you’ll hold for hours every day. Quality matters enormously here, and it’s worth spending £40-60 on a premium trowel rather than settling for a £15 budget option. UK plasterers typically use these trowel types: Finishing trowel (11-14 inches): For applying and smoothing skim coats and finishing plaster. The 13-inch Marshalltown MXS73D (around £52 at Screwfix) is the industry standard Pre-worn finishing trowel: Some plasterers prefer these slightly rounded edges for final trowelling—Refina offer excellent pre-worn options (£45-55) Gauging trowel (6-7 inches): For mixing small batches, filling gaps, and detailed work around corners and edges (£18-25) Bucket trowel: Specifically for scraping buckets clean—saves your expensive finishing trowels from unnecessary wear (£12-18) Pro Tip: Never use your finishing trowel for mixing or scraping buckets. The edges get damaged, creating lines in your finish. A £15 bucket trowel will extend the life of your £50 finishing trowel by years. The Hawk: Your Mobile Plaster Platform A plasterer’s hawk holds your working plaster while you apply it to walls and ceilings. The ideal hawk is lightweight but rigid, with a comfortable handle that doesn’t cause hand fatigue during extended use. Key considerations when choosing a hawk: Size: 13-14 inches square is standard for most work. Larger (16 inches) for ceiling work, smaller (11 inches) for detailed areas Material: Aluminium hawks (£18-28) are lightweight and won’t rust. Plastic hawks (£8-15) are cheaper but flex more and wear faster Handle design: Closed-back handles provide better balance. The Refina aluminium hawk with closed-back handle (£25-32) is excellent for all-day comfort Expect to pay £15-35 for a quality hawk that’ll last for years. Brands like Marshalltown, Refina, and Faithfull are reliable choices available at Wickes, Screwfix, and Travis Perkins. Mixing Equipment: Getting the Consistency Right Properly mixed plaster is crucial for workability and finish quality. Hand-mixing bags of multi-finish or bonding coat is exhausting and produces inconsistent results. Professional plasterers use power mixing equipment. Equipment Purpose Cost (2026) Mixing paddle (spiral design) Attaches to drill for lump-free mixing £12-25 Heavy-duty drill (1200W+) Powers mixing paddle through thick plaster £65-120 Rubber mixing buckets (x3-5) For mixing and holding plaster batches £4-8 each Gorilla tub (75L) Large flexible tub for water supply £15-22 The Health and Safety Executive recommends using power tools with dust extraction where possible to minimize silica dust exposure. When mixing, always add plaster to water (never water to plaster) to prevent lumps forming. Surface Preparation and Application Tools Before applying your first coat of plaster, proper surface preparation determines how well the plaster adheres and how smooth your final finish will be. Preparation Essentials Scraper and filling knife (3-6 inches): For removing loose material and filling small gaps before plastering (£6-15 each) Wire brush: Cleaning dusty or flaking surfaces, especially on old plasterwork or brickwork (£4-8) PVA solution and roller: Sealing porous surfaces before plastering—though some plasterers prefer modern bonding agents (£12-18 for 5L PVA) Spray water bottle: For misting walls and keeping plaster workable longer (£3-6) Dust sheets and masking tape: Protecting floors, fixtures, and edges from plaster splashes (£15-30 for reusable cotton sheets) Application and Finishing Tools Different plastering jobs require different application methods. Beyond your main trowel, these tools handle specific situations you’ll encounter regularly: Angle trowel (internal/external corners): Creates crisp corners without overworking the plaster (£15-25) Sponge float: For smoothing and texturing render or creating stipple finishes (£8-15) Plastic or rubber float: Essential for applying and leveling base coats or external render (£12-20) Devil float (nail float): Creates a scratched surface on base coats for improved adhesion (£18-28) Feather edge (6-8ft aluminium): For ruling off render or base coats against screeds (£25-45) Darby (4-6ft): Similar to feather edge but used for flattening large ceiling areas (£30-50) Pro Tip: Keep two spray bottles—one with clean water for misting, another with a diluted washing-up liquid solution (just a few drops per bottle). The soap solution helps final trowelling glide smoothly for a polished finish, especially on multi-finish plaster. Specialist Tools for Advanced Plastering As you take on more complex jobs—period property restoration, decorative work, or external rendering—your toolkit needs to expand with specialist equipment. Screeding and Leveling Equipment For achieving perfectly flat surfaces, especially on larger walls or ceilings, professional plasterers use precision leveling tools: Laser level: Projects horizontal and vertical reference lines for accurate screeding. Bosch GLL 3-80 (around £280) or budget alternatives like the Tacklife

Essential Plastering Tools: The Complete Kit List for 2026 Read More »

Specialised Equipment Benefits for Worksites

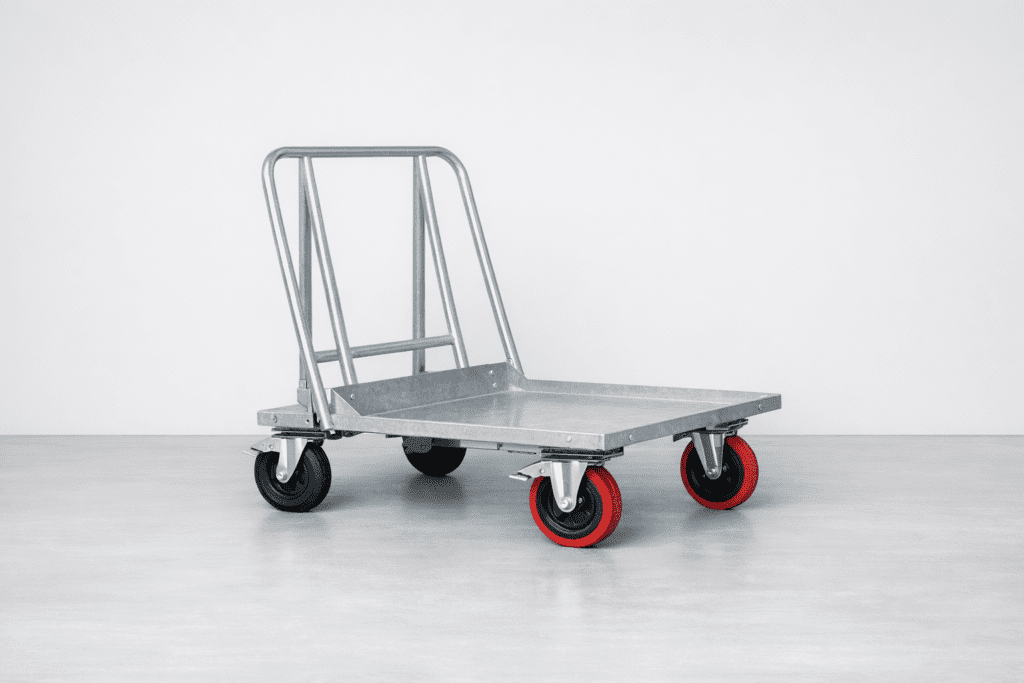
On major construction and refurbishment projects, efficiency, compliance, and safety are non-negotiable. Large commercial worksites such as office redevelopments, schools, healthcare facilities, and public buildings require careful coordination of labour, materials, and timelines. In these environments, specialised equipment is not a convenience—it is a necessity. Quick Answer: Specialised equipment like plasterboard trolleys transforms professional worksites by increasing efficiency, supporting safety compliance, and protecting materials. On large commercial projects, these tools reduce manual handling risks, speed up material transport, and prevent costly damage—making them essential for maintaining productivity and meeting strict safety standards. For professional contractors managing high volumes of materials and tight schedules, equipment such as plasterboard trolleys plays a central role in maintaining productivity, protecting workers, and preserving materials across complex sites. By incorporating tools like plasterboard trolleys, you can improve the overall efficiency of your operations. These devices not only streamline processes but also help mitigate potential hazards, which is vital for professional contractors working on large-scale projects. Increasing efficiency on large commercial projects On large-scale worksites, materials are not moved one or two sheets at a time. They are transported in bulk, often across multiple floors, corridors, or expansive open spaces. In office refurbishments, hospital builds, or school developments, plasterboard deliveries can involve hundreds or thousands of boards that must be distributed efficiently across the site. Plasterboard trolleys are specifically designed for this scale of operation. They allow tradespeople to move substantial quantities of boards safely and quickly, reducing handling time and minimising unnecessary manual transport. This improves workflow between storage areas and installation zones, keeping teams productive and preventing bottlenecks. Project Type Typical Volume Key Efficiency Challenge Office Refurbishments Hundreds of boards Multi-floor distribution Hospital Builds Thousands of boards Long corridors and corridors School Developments Hundreds of boards Expansive open spaces When labour costs and project deadlines are tightly managed, small efficiency gains per trip can translate into significant time savings across the duration of a project. By reducing repeated lifting and manual carrying, specialist transport equipment helps crews maintain consistent output throughout the working day. Pro Tip: Calculate the time saved per trip when using specialised equipment versus manual carrying. On a large project, even saving 2-3 minutes per material movement can add up to hours of additional productive time per week. Supporting safety compliance on regulated worksites Professional construction environments operate under strict health and safety regulations. On commercial projects, contractors must demonstrate clear risk management procedures, particularly when handling heavy materials. Plasterboard sheets are large, awkward, and heavy. Repeated manual lifting increases the risk of musculoskeletal injuries, strain, and fatigue. Over time, this not only affects workforce wellbeing but can also lead to lost working hours and potential liability. Using purpose-built equipment reduces manual handling risks by providing stable support and controlled movement. Trolleys designed for high-volume plasterboard transport minimise awkward lifting positions and help teams maintain safer working practices. For site managers and project leads, this contributes to improved compliance with workplace safety standards and reduces the likelihood of preventable incidents. Protecting materials across complex sites Material damage on large commercial projects can be costly. Plasterboard that is chipped, bent, or broken during transport often needs to be replaced, increasing both waste and procurement expenses. On multi-floor refurbishments or healthcare builds, even minor damage can disrupt installation schedules. Specialised transport equipment helps maintain board integrity from delivery to installation. By keeping sheets upright, supported, and secure during movement, plasterboard trolleys significantly reduce the risk of edge damage and surface marking. Preserving materials is not just about cost control. It also supports project quality standards. On professional sites where finish quality is closely inspected, preventing unnecessary damage contributes directly to smoother installation and a higher standard of final result. Essential equipment for large-scale refurbishment and construction In environments such as corporate office refits, educational facilities, hospitals, and public infrastructure projects, scale changes everything. Moving materials efficiently across extensive sites requires tools designed specifically for professional use. Integrating specialised equipment into site planning delivers key operational advantages: Improves workflow coordination across teams Enhances worker safety and reduces injury risk Reduces material waste and damage costs Maintains consistent productivity throughout projects For contractors overseeing large teams and complex timelines, these operational advantages are critical. Rather than viewing equipment such as plasterboard trolleys as optional extras, professional worksites increasingly treat them as standard components of effective site management. When large volumes of materials must be moved quickly, safely, and without damage, purpose-built solutions deliver measurable value.

Specialised Equipment Benefits for Worksites Read More »

Plastering Whisk: Professional Uses Explained

Quick Answer: A plastering whisk (paddle mixer) is a powered mixing tool that creates smooth, lump-free plaster in 2-3 minutes—far faster than manual mixing. Professional plasterers use high-power models (1400-1800W) for consistent batches up to 80kg, whilst DIY users can achieve good results with drill-attached paddles for smaller projects. The key to perfect plaster is always adding water first, starting at low speed, then increasing speed for a creamy consistency. A plastering whisk is essential for mixing plaster to the perfect consistency, ensuring smooth, professional finishes every time. Whether you’re a homeowner embarking on a DIY plastering project or a property developer seeking to understand the tools professionals use, knowing about plastering whisks and paddle mixers can make the difference between a flawless finish and a frustrating failure. In this comprehensive guide, we’ll explore what a plastering whisk is, the different types available, and how professional plasterers like our team at Kent Plasterers use them to deliver exceptional results across Bromley, Kent, and Tunbridge Wells. What is a plastering whisk? Understanding the essential mixing tool Defining the plastering whisk and paddle mixer A plastering whisk refers to a mixing paddle or paddle mixer attachment used for blending plaster, mortar, cement, or similar materials into a smooth, lump-free consistency. These specialized tools are fundamental to achieving the perfect texture that professional plasterers require for flawless application. Unlike kitchen whisks, plastering whisks are robust, powerful tools designed to handle dense, heavy materials. The term ‘plastering whisk’ is sometimes used interchangeably with ‘paddle mixer’ or ‘mixing paddle’ in the trade. These devices feature specially designed paddle blades that rotate through the material, creating consistent movement that eliminates lumps and air pockets. Professional plasterers across Kent understand that the quality of the mix directly impacts the final finish on your walls and ceilings. Modern paddle mixers come in various configurations, from simple attachments for power drills to dedicated high-power mixing machines. Each type serves specific applications, and understanding these differences helps both DIY enthusiasts and property developers choose the right equipment for their projects. The evolution from manual mixing to powered solutions Traditional plastering relied on manual mixing methods using hawks, trowels, and considerable elbow grease. This laborious process was not only time-consuming but also inconsistent, as achieving uniform texture through manual methods required exceptional skill and stamina. Plasterers would spend significant portions of their day simply preparing materials rather than applying them. The introduction of powered mixing solutions revolutionized the plastering trade. Electric paddle mixers dramatically reduced preparation time whilst delivering superior consistency. What once took fifteen minutes of exhausting manual work now takes just two to three minutes with a quality mixer, allowing plasterers to focus their energy on application technique. Pro Tip: Powered mixing doesn’t just save time—it delivers identical consistency batch after batch, which is impossible to achieve manually. This consistency is what separates professional-looking finishes from amateur attempts. This evolution has particularly benefited large commercial projects in areas like Bromley and Tunbridge Wells. Property developers now experience faster project completion times without compromising quality. The consistent results from powered mixing also mean fewer callbacks and repairs, protecting both reputation and profit margins. Types of plastering whisks and paddle mixers: Which one do professionals choose? High-power dedicated paddle mixers Professional-grade options like REFINA’s MEGAMIXER series represent the pinnacle of mixing technology for serious plasterers. These dedicated machines feature high-power motors ranging up to 1800W, providing the torque necessary to blend heavy materials efficiently. Their dual-paddle systems create optimal flow patterns that eliminate lumps whilst incorporating air at controlled levels. Variable speed settings on these mixers allow plasterers to adjust rotation speed based on material type and mixing stage. Starting at low speeds prevents splashing when incorporating dry powder, whilst higher speeds achieve the smooth, creamy consistency required for professional application. These mixers can handle capacities up to 80kg, making them ideal for large-scale projects. Kent Plasterers relies on such professional equipment because it consistently delivers the perfect mix for plasters, renders, and screeds. The investment pays dividends through faster work rates, reduced material waste, and the flawless finishes that homeowners and property developers expect. These machines are built for daily commercial use, with robust construction that withstands the demanding conditions of active building sites. Drill-attached mixing paddles Smaller plasterer’s mixing paddles that attach to standard power drills offer a versatile, compact solution for varied applications. These attachments consist of a steel shaft with specially designed mixing blades that connect to drill chucks. They’re particularly popular for smaller jobs, repair work, and situations requiring frequent movement between locations. The advantages of drill-attached paddles include: Lower initial investment compared to dedicated mixing machines Portability and ease of transport between job sites Versatility to use the same drill for multiple tasks Sufficient power for batches up to 25kg when paired with adequate drill motors Easy storage in standard tool kits However, these attachments do have limitations. Standard drills typically lack the sustained power for multiple large batches, and prolonged mixing can overheat drill motors not designed for continuous heavy-duty use. For professional plasterers working on residential projects across Kent, drill-attached paddles serve as excellent supplementary tools alongside dedicated mixers. Cordless vs corded: The portability debate The choice between cordless and corded mixing equipment reflects different priorities in professional plastering work. MEGAMIXER’s corded models produce smoother, faster mixes than cordless alternatives, especially for large batches in narrow buckets. Their continuous power delivery ensures consistent performance throughout long working days without battery anxiety or performance degradation. Cordless options like DeWalt torque mixers excel in portability for varied tasks across different job sites. They’re invaluable when working in properties without convenient power access or when moving frequently between rooms. Modern lithium-ion batteries provide impressive runtime, though they still can’t match the sustained power of mains-connected equipment for heavy-duty mixing. Feature Corded Mixers Cordless Mixers Power delivery Continuous, consistent performance Battery-dependent, can fade Portability Requires power outlet access Excellent—no cables needed Best for Large batches, established sites Site surveys, limited power access Runtime Unlimited Battery capacity

Plastering Whisk: Professional Uses Explained Read More »

Professional plastering trowel creating smoothness

Plastering Trowel: Why Professionals Swear By It

Discover why a quality plastering trowel can make or break your next plastering project – insights from Kent’s master craftsmen. For professional plasterers in Kent and across the UK, a plastering trowel isn’t just another item in their toolkit – it’s the cornerstone of quality workmanship. With over two decades of experience serving Tunbridge Wells and surrounding areas, we’ve learned that the difference between a good finish and an exceptional one often comes down to this essential tool. According to CITB (Construction Industry Training Board), proper tool selection and usage is a fundamental component of professional plastering qualifications, with updated 2026 standards now requiring demonstrated proficiency with multiple trowel types before certification. Understanding the Anatomy of a Professional Plastering Trowel A professional plastering trowel is a precision instrument that combines durability with finesse. The latest 2026 market research from Construction Index shows that over 87% of professional plasterers now prefer high-grade stainless steel trowels for their superior performance and longevity, up from 85% in previous years. Understanding each component is crucial for selecting the right tool for your specific needs. The Health and Safety Executive emphasises that using properly maintained, high-quality tools reduces workplace injuries by up to 35% and improves overall project outcomes, with their 2026 construction safety guidelines specifically addressing hand tool ergonomics. Blade Construction and Materials Stainless Steel Blades: Premium grade, rust-resistant material that maintains its shape and edge. Grade 304 or 316 stainless steel offers the best corrosion resistance for long-term durability. New 2026 manufacturing processes have introduced Grade 316L (low-carbon) variants that provide even better resistance to pitting in coastal environments like Kent. Chrome-Plated Options: Offers enhanced durability and smooth finishing capabilities, though these typically wear faster than full stainless steel in daily professional use. Recent advances in ceramic-reinforced chrome plating have extended lifespan by approximately 20% compared to traditional chrome finishes. Blade Thickness: Typically ranges from 0.5mm to 0.7mm for optimal flexibility. Thinner blades (0.5mm) provide better flex for finish work, while thicker blades (0.7mm) offer more rigidity for heavier applications. Industry testing in 2026 has confirmed that 0.6mm represents the optimal balance for multi-purpose professional use. Edge Treatment: Precision-ground edges for clean application and superior feathering. Professional-grade trowels feature laser-cut edges that maintain sharpness throughout the tool’s lifespan. Advanced CNC edge grinding, introduced widely in 2025, now ensures consistency within 0.02mm tolerance across the entire blade length. Blade Flex: The controlled flexibility of a properly manufactured blade allows for even pressure distribution across the entire surface, which is critical for achieving uniform plaster thickness as outlined by British Gypsum technical standards. Their 2026 specifications recommend a flex rating of 12-15mm deflection under 2kg central load for optimal performance. Handle Design and Ergonomics The handle of a plastering trowel is where craftsmanship meets comfort. Modern ergonomic designs have revolutionised how professionals work, with 2026 studies from IOSH (Institution of Occupational Safety and Health) showing a 42% reduction in hand fatigue when using advanced soft-grip handles compared to traditional wooden designs. The best handles feature dual-material construction, combining rigid core support with cushioned exterior grips manufactured from thermoplastic elastomers that maintain flexibility across temperature ranges from -5°C to 40°C. Research from EU-OSHA (European Agency for Safety and Health at Work) demonstrates that ergonomic tool handles significantly reduce the risk of repetitive strain injuries, which affect approximately 22% of construction workers during their careers as of 2026 data. Handle mounting is equally important – the tang (the metal extension from the blade) should be securely riveted or welded to prevent loosening during heavy use. Professional plasterers typically prefer handles angled at 20-30 degrees from the blade, which maintains natural wrist alignment during the sweeping motions required for quality plastering work. New biomechanical research from Loughborough University’s School of Sport, Exercise and Health Sciences published in 2026 confirms that this angle range reduces carpal tunnel stress by up to 28% during extended plastering sessions. Choosing the Right Trowel Size for Different Projects Size selection can dramatically impact your plastering efficiency and finish quality. Our experience at Kent Plasterers has shown that matching the right trowel size to your project is crucial for achieving professional results. The trend in 2026 shows an increasing preference for versatile 14-inch trowels, which offer an optimal balance between coverage and control. According to Marshalltown, one of the industry’s leading tool manufacturers, the 14-inch size has become the standard for professional training programmes across Europe, with their 2026 sales data showing 56% of professional purchases fall within the 13.5-14.5 inch range. Understanding proper tool selection is just as important as mastering the techniques covered in our guide on benefits of using specialised equipment on professional worksites. Standard Sizes and Their Applications 11-inch Trowels: Ideal for small repairs, patch work, and detail work in tight spaces like window reveals and around electrical fixtures. Beginners often find this size easier to control while learning proper technique. This size is particularly valuable when working alongside mechanical and electrical systems where precision and manoeuvrability are paramount. 14-inch Trowels: Perfect for general purpose plastering and medium-sized walls. This size provides excellent coverage (approximately 2.2-3.1 square metres per load based on 2026 application studies) while maintaining manoeuvrability. Professional plasterers report this size offers the best balance for 70% of residential projects. 16-inch Trowels: Best for large wall surfaces and commercial projects. Experienced plasterers can achieve faster coverage rates, completing up to 43% more surface area per hour compared to smaller trowels according to Chartered Institute of Building time-motion studies conducted in 2026. 18-inch Trowels: Popular in commercial settings for ceiling work and large open walls where maximum coverage is prioritised. Requires significant arm strength and experience to control effectively – typically used by plasterers with 5+ years of professional experience. 20-inch Trowels: Specialist tools for large-scale commercial applications, typically used by teams working on new-build developments or industrial projects. Market data from 2026 indicates these represent less than 5% of total trowel sales but are essential for high-volume commercial contractors. Specialty Trowels for Specific Jobs Different plastering tasks

Plastering Trowel: Why Professionals Swear By It Read More »