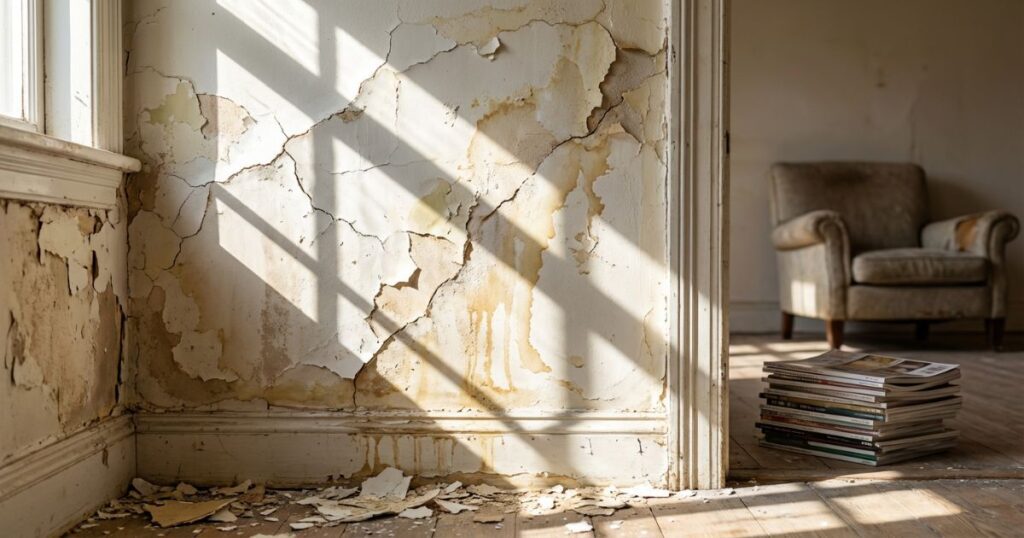
Problems & Repairs

How Foundation Repairing Affects Plastering and Interior Finishes

When people think about home repairs, they most likely separate structure from style. They think about the base of the house and the pretty finishes inside as two different things. However, these are closely connected. Foundation repair directly impacts your walls, ceilings, plaster, and flooring; if the home’s base shifts, everything above it responds. That’s why it is important to understand how structural work and interior finishes go hand in hand. Fixing cracks in plaster without addressing the root cause is like painting over a leak. It may look good for a while, but the problem will come back. Bluebird CFW, a Michigan-based foundation repair company, has shown time and time again that stabilizing a home’s base changes everything that happens inside. Once the structure is secure, real interior restoration can begin properly. The Role of a Strong Foundation Your foundation is your home’s backbone. It supports the weight of the walls, the floors, and the roof. Every beam and joist depends on staying stable. When the foundation is level and secure, everything above it remains aligned. But when it shifts, the house reacts. Walls may begin to crack, and doors might stick. These aren’t random cosmetic flaws. They’re signs that the structure beneath is moving. Early warning signs usually appear inside the home first, such as hairline cracks in plaster and small gaps growing between skirting boards and floors. You might also notice diagonal cracks near doors or windows, or tiny separations where walls meet ceilings. The foundation does not fall overnight. It shows signs. Common Foundation Problems That Affect Interior Finishes Foundation problems have many causes. When one or more of these is at play, you’ll likely notice small signs of damage spreading throughout your home. Settlement and Uneven Load Distribution Settlement happens when soil beneath the foundation shifts. This occurs naturally over time, often due to drainage problems and poor soil conditions. When one part of the foundation sinks slightly, weight redistributes across the structure. That uneven load puts pressure on walls and ceilings and can cause cracks in plaster, uneven floors, and gaps around the window frame inside the house. Plaster is strong, but it is not flexible; when the structure beneath it moves, it starts to crack. Foundation Cracks and Structural Shifts Foundation cracks are another major issue. Not all cracks are serious, but structural cracks can signal shifting or stress within the base of the home. When the foundation shifts horizontally or vertically, the framing above responds. Studs may twist slightly, or joists may adjust. That movement travels up into plastered surfaces. You may notice stair-step cracks, diagonal damage, or even separation near the ceiling. These aren’t surface problems; they’re signs of deeper movement. If you repair the plaster but don’t address the foundation problems, you’ll likely deal with cracks reopening quickly. Moisture Intrusion and Rising Damp Moisture is one of the most damaging forces in any home. When foundation walls allow water intrusion, moisture can travel upward into floors and walls. This weakens plaster from behind, causing bubbling, flaking, and staining. You might notice peeling paint, crumbling plaster, soft spots, or musty smells. Moisture also supports mold growth, which creates health concerns. That’s why structural repairs frequently include waterproofing or improvement in drainage systems. Best Practices for Restoring Interior Finishes After Foundation Repair Interior restoration can proceed after foundation stabilization. The first step is to check all visible cracks and damage. Some may only need filling, and others may require more plastering work. Flexible fillers are often used for minor cracks, but for larger damaged areas, sections of plaster may need to be removed and re-applied. Loose materials must be scraped away, dust must be cleaned off, and primers need to be applied where necessary. Skipping preparation leads to poor adhesion and uneven finishes. For damp-affected walls, allow proper drying time before replastering; rushing this stage traps moisture behind new finishes. Once foundation repairs are complete, repainting or refinishing can restore the home’s appearance. Take this stage seriously—good craftsmanship ensures repairs blend seamlessly into existing surfaces. How Professional Foundation Repair Protects Interior Finishes Structural experts understand how the building works as a whole. They don’t just fix cracks in concrete. They understand the root causes and fix the entire system. They’ll check soil conditions, drainage patterns, structural loads, and more to determine if these are the problems or not. Following that, they’ll recommend and perform specific solutions to prevent further damage. When complete, your home will be more stable, and your interior finishes will last longer. Conclusion Foundation issues don’t stay hidden below ground. They rise into your walls, ceilings, and floors. Cracks in plaster are often messages from the underlying structure, and by learning what to look for, you’re educating yourself about when to call a professional. Solid foundations support more than walls. They protect every finish inside your home. When repairs are done in the right order, your home becomes stronger and more beautiful at the same time.

How Foundation Repairing Affects Plastering and Interior Finishes Read More »

What Happens If You Plaster Over Water Damage or Foundation Cracks?

For many homeowners, plastering over a problem might feel like a fast way to fix leaks or visible damage. The problem isn’t what the plaster covers; it’s what stays active below the surface. Water damage and foundation issues do not stop just because the surface looks clean. When foundation repair is delayed, moisture can stay trapped inside the walls, and cracks continue to shift as the structure moves. In the long run, those hidden problems show up again, usually worse than before. Understanding Water Damage and Foundation Cracks Water damage and foundation cracks develop gradually and are caused by similar causes. Understanding how each problem forms can make it easier to understand why surface repair fails. Water Damage Water damage starts when moisture enters an area that should stay dry. Roof leaks, plumbing issues, poor drainage, and groundwater pressure allow water to slowly seep into your home’s structure. Wooden surfaces, drywall, concrete, and insulation all absorb moisture at different rates. Gradually, you’ll start noticing stains and damage throughout your home. Foundation Cracks At the same time, foundations crack under stress. Soil expands during wet and humid seasons, but shrinks during the summer. Temperature changes and moisture levels also lead to movement in the soil, and this puts additional strain on the foundation, eventually causing cracks near corners and in basement walls. Why Plastering Seems Like an Easy Fix Plastering is easy. It removes problems like cracks and stains immediately. For homeowners dealing with visible damage, the improvement feels instant and worth it. Plastering is also simpler than complex repairs, inspections, or major structural evaluations. Many homeowners simply assume the damage is caused by an issue that no longer exists, so they don’t think to look for the underlying cause. Cost is also a factor why homeowners opt for surface repair, which costs less than structural or moisture-related work. When the damage seems minor, spending more can feel unnecessary. But plastering over water-damaged walls or foundation cracks addresses the appearance, not the cause; while it might look good, the damage can worsen in the long run and lead to costly repairs later. What Happens if You Plaster Over Water Damage? Plastering can hide a crack. But it doesn’t stop movement. If the foundation continues to shift, the crack remains active under the surface. The walks may look stable for a while, but the structure is not. Trapped Moisture and Dampness Plaster forms a sealed layer over the surface. If a coat of plaster traps moisture, dampness spreads downwards and sideways. It can reach previously unaffected areas and lead to other materials absorbing moisture and weakening, even if they don’t show obvious signs of problems. As humidity rises due to the trapped moisture, the damage spreads further. Mold and Mildew Growth Moisture trapped behind the plaster does not dry out easily. When air cannot circulate, mold has time to develop without showing on the surface. It often grows in walls, though it can also develop inside baseboards and insulation. These areas hide the damage, so by the time the odor or discoloration appears, the spread is usually worse than before the plaster was applied. Plaster Failure and Peeling Paint Plaster relies on a stable, dry surface to bond properly. When moisture pushes behind, adhesion weakens. Cracks return, and paint bubbles, flakes, or peels. In some cases, plaster can fully separate from the wall. Repaired sections may hold for a few months before the signs return, but when damage reappears, it affects a wider area than the earliest patch. Structural Material Deterioration Water breaks the material down slowly. Wood swells and softens, metal fasteners corrode, and concrete absorbs moisture and loses surface integrity. Plaster hides these changes while they continue, but as materials degrade, they weaken further and further. What starts as a visible stain can lead to damage in frames and weak wall sections. Surface repair is no longer an option at this point; instead, you’ll likely need costly repairs. What Happens if You Plaster Over Foundation Cracks? When plaster is put over an active crack, the surface looks stable even though the structure is not. But cracks respond to soil pressure, moisture changes, and shifting loads. Covering them delays visibility, but does nothing to fix the damage. Reappearance and Worsening Damage As the structure shifts, the plaster layer absorbs the stress until it falls. Hairline cracks and wider cracks appear. In some cases, new cracks form next to the repaired area. This can create the impression of spreading damage, even though the initial cause does not change. Repeated patching does not stop the pattern—instead, each repair fails faster due to the underlying damage. Hidden Structural Movement Plaster blocks visual access to the crack. While it may appear nice, it’s now hiding changes you otherwise might notice. Cracks could be widening, or veering off in a new direction. As seasonal soil changes, moisture levels, and load distribution continue affecting the foundation, the cracks stay hidden until damage is severe enough to be noticed. Signs You Have Plastered Over an Unresolved Issue When you plaster over damage without addressing the underlying issue, the damage will repeat over time. Cracks that recur in the same spot often indicate the movement has not stopped, while paint that bubbles or flakes over repairs points to moisture spreading. You may notice a musty smell in walls that otherwise appear dry, or doors and windows sticking after surface repairs. It could even be as simple as walls that feel cool, soft, or uneven to touch. These signs don’t appear at once, but they all signal a higher likelihood of structural damage. Proper Steps to Take Before Plastering Plaster should be the last step after all the repairs have been completed. Before any surface repair, the condition behind the wall needs attention. Skipping any of these steps turns the plaster into a cover, instead of a fix. That means that full repairs will be more expensive and time-consuming. Conclusion Plaster may change the appearance, but it can’t correct the cause of

What Happens If You Plaster Over Water Damage or Foundation Cracks? Read More »

Blown Plaster: What Causes It and How to Fix It

Quick Answer: Blown plaster occurs when the plaster coating loses adhesion to the substrate beneath, creating hollow-sounding areas that move when pressed. The primary causes are moisture penetration, inadequate preparation, incorrect mixing ratios, or applying plaster to unsuitable surfaces. Repair involves removing all loose material, treating underlying issues (especially damp), applying appropriate bonding agents, and replastering with the correct specification for the substrate. Small patches (under 1m²) cost £80-150 to repair professionally, whilst entire room replastering ranges from £400-800 depending on size. What Is Blown Plaster? Blown plaster, also known as plaster debonding or hollow plaster, describes the condition where plasterwork separates from its backing surface. You’ll recognise it immediately when you tap the wall — instead of a solid sound, you’ll hear a distinctive hollow, drum-like noise. The plaster itself may appear perfectly sound visually, but the loss of adhesion means it’s only a matter of time before it bulges, cracks, or falls away completely. In severe cases, you can press the surface and feel it flexing beneath your hand. This isn’t just an aesthetic problem. Blown plaster compromises the structural integrity of your wall finish and creates ideal conditions for further deterioration. Left untreated, small affected areas inevitably expand as moisture and movement exploit the void between plaster and substrate. Common Causes of Blown Plaster Understanding what causes plaster to blow is essential for both preventing the problem and ensuring repairs last. After three decades in the trade, I’ve seen the same underlying issues repeatedly: 1. Moisture and Damp Penetration This is by far the most common cause of blown plaster. When moisture enters the wall cavity — whether from rising damp, penetrating damp, or condensation — it attacks the bond between plaster and substrate. Rising damp: Ground moisture travelling up through masonry via capillary action, typically affecting walls within 1.2m of floor level Penetrating damp: External water ingress through damaged pointing, cracked render, faulty guttering, or roof leaks Condensation: Prolonged surface moisture in poorly ventilated rooms, particularly bathrooms and kitchens Plumbing leaks: Hidden pipe failures within walls or beneath floors Hygroscopic salts deposited by evaporating moisture also contribute to debonding. These salts crystallise behind the plaster surface, physically pushing it away from the substrate — a process visible as white, powdery efflorescence when the plaster fails. 2. Poor Surface Preparation Inadequate preparation accounts for countless plaster failures. The substrate must be clean, sound, and properly treated before plastering commences. Dusty surfaces: Loose particles prevent proper adhesion (should be brushed down and treated with PVA or bonding agent) Contaminated substrates: Paint, wallpaper paste, grease, or oil residues create barriers to adhesion High suction backgrounds: Very porous surfaces like lightweight blocks or old lime plaster require suction control with bonding agents Smooth, dense surfaces: Engineering bricks or concrete need mechanical keying or specialist bonding products 3. Incorrect Plaster Specification or Mixing Using the wrong plaster type or mixing it incorrectly causes bond failure and premature deterioration. Gypsum on lime: Applying modern gypsum plasters directly to historic lime substrates causes incompatibility issues Over-watered mixes: Excessive water weakens the set and reduces adhesion strength (multi-finish should be mixed to thick cream consistency) Re-tempered plaster: Adding water to partially set material destroys the chemical structure Expired materials: Aged plaster loses its setting properties and won’t achieve proper bond strength Pro Tip: Always check the bag date on your plaster. British Gypsum products have a typical shelf life of 4-6 months from manufacture when stored correctly. Beyond this, the setting time becomes unpredictable and bond strength diminishes significantly. 4. Building Movement and Settlement Physical stress from structural movement can fracture the bond between plaster and wall, particularly in newer properties still settling or older buildings with subsidence issues. Foundation settlement: Differential movement in new builds during the first 2-5 years Thermal expansion: Seasonal expansion and contraction of materials with different coefficients Vibration: Properties near railways, busy roads, or construction sites Structural alterations: Load redistribution after removing walls or installing openings 5. Inappropriate Base Materials Some substrates simply won’t accept direct plastering without special preparation or intermediate layers. Painted surfaces: Emulsion and gloss create non-porous barriers (must be removed or treated) Glazed surfaces: Tiles need physical removal or specialist bonding systems Metal lath: Requires proper nailing schedules and appropriate backing coats Incompatible blocks: Some lightweight blocks need specific plaster grades or drylining instead How to Identify Blown Plaster Early detection prevents extensive damage and reduces repair costs. Here’s how to diagnose blown plaster systematically: Visual Inspection Surface bulging: Raised areas or bubbles in the plaster finish indicating separation Crack patterns: Map-pattern cracking often accompanies debonding, particularly around affected areas Discolouration: Damp patches, brown/yellow staining, or white salt deposits (efflorescence) Loose edges: Plaster lifting away at skirting boards, corners, or where it meets sound areas Tap Testing The most reliable diagnostic method. Use your knuckles to tap across the wall surface systematically. Sound plaster produces a solid, dull thud. Blown plaster creates a hollow, resonant sound — like tapping a drum. Work in a grid pattern across the entire wall to map affected areas. Mark the perimeter of hollow sections with a pencil to establish the full extent before starting repairs. Press Testing Apply firm pressure with your palm against suspected areas. Blown plaster will flex noticeably beneath your hand, sometimes even cracking under moderate pressure. Sound plaster remains completely rigid. ⚠️ Warning: Large areas of blown plaster can detach suddenly without warning, particularly on ceilings. If you identify significant ceiling debonding, evacuate the room and call a professional immediately. A 2m² section of plaster and plasterboard can weigh 40kg+ and cause serious injury. Step-by-Step Guide to Repairing Blown Plaster Proper repair requires addressing both the symptom (loose plaster) and the cause (usually moisture). Rushing this process guarantees failure within months. Step 1: Identify and Resolve the Underlying Cause Never replaster until you’ve eliminated the root cause. If moisture is present, you must treat the damp problem first and allow the wall to dry completely. Commission a CSRT-qualified damp surveyor for accurate diagnosis Install

Blown Plaster: What Causes It and How to Fix It Read More »

How to Repair Cracked Plaster Walls: Step-by-Step Guide

Quick Answer: Most cracked plaster walls can be repaired DIY using flexible filler for hairline cracks (under 2mm) or proper filling and replastering techniques for larger structural cracks (over 5mm). Small cosmetic cracks take 1-2 hours and cost £10-£30 in materials, whilst major crack repairs requiring replastering typically cost £200-£600 professionally. The key is identifying why the crack formed — settlement, moisture, or structural movement — before attempting repairs. Understanding Why Plaster Cracks Matter Cracked plaster walls are one of the most common issues we encounter as professional plasterers in Kent, and they’re rarely just a cosmetic problem. Whether you’re dealing with fine hairline cracks around door frames or worrying splits that seem to be getting wider, understanding what’s causing the damage is essential before you reach for any filler. The good news? Most plaster cracks are perfectly repairable, and many smaller ones are well within the capabilities of a competent DIY enthusiast. The challenge lies in distinguishing between harmless surface crazing and cracks that signal something more serious like subsidence or structural movement. This comprehensive guide will walk you through everything you need to know about repairing cracked plaster walls, from diagnosis through to professional finishing techniques. We’ll cover the tools you’ll need, the materials that actually work, and the step-by-step processes that deliver lasting results. Types of Plaster Cracks and What They Mean Not all cracks are created equal. Before you start any repair work, you need to identify what type of crack you’re dealing with and what’s causing it. Here’s what different crack patterns typically indicate: Crack Type Appearance Likely Cause Severity Hairline cracks Under 2mm wide, surface level Natural settlement, thermal movement, plaster shrinkage Low — cosmetic only Vertical cracks 2-5mm, running floor to ceiling Wall movement, drying out of new buildings, seasonal changes Low to medium Diagonal cracks Running from corners of doors/windows Lintel failure, settlement, structural movement Medium to high Horizontal cracks Running along walls, often mid-height Structural issues, ceiling joist movement, subsidence Medium to high Crazing/map cracking Multiple fine cracks in random pattern Plaster applied too quickly, poor suction control, overworking Low — surface issue Stepped cracks Following mortar joints in brickwork Serious subsidence or structural movement High — professional assessment needed ⚠️ Warning: Any crack wider than 5mm, cracks that are visibly getting wider, or multiple cracks appearing in a short timeframe should be assessed by a structural engineer before attempting cosmetic repairs. These may indicate serious foundation or structural issues that need professional attention. According to RICS guidance, cracks over 15mm can indicate severe structural damage requiring urgent professional intervention. When to DIY vs When to Call a Professional Knowing your limits is crucial when it comes to plaster crack repair. Here’s an honest assessment of what you can tackle yourself and when you need to bring in the professionals: Safe for DIY Repair: Hairline cracks under 2mm caused by natural settlement or minor thermal movement Cosmetic surface cracks in plasterwork that’s otherwise sound and stable Small areas of damaged plaster (under 1 square metre) where the backing is solid Cracks around door frames and windows that haven’t changed in 6+ months Map crazing or spider web patterns that are purely surface level Requires Professional Assessment: Any crack over 5mm wide or showing signs of active movement Stepped cracks following mortar joints in the brickwork beneath Cracks accompanied by damp patches, which may indicate water ingress issues (see our damp proofing guide for more information) Bulging or bowing walls where plaster has separated from the substrate Multiple new cracks appearing over a short period (3-6 months) Cracks in newly built properties under warranty — document and report to your builder If you’re unsure about the severity of cracking, it’s worth monitoring it for 3-6 months using tell-tales — small strips of glass or plaster fixed across the crack with reference marks and dates. If the tell-tale breaks, your crack is still moving and needs professional investigation before repair. Essential Tools and Materials for Crack Repair Having the right tools and materials makes all the difference between a repair that lasts and one that fails within months. Here’s what you’ll need based on the type of repair you’re undertaking: For Hairline Crack Repair (Under 2mm): Flexible crack filler — Polyfilla Fine Surface Filler or Toupret Interior Filler (£6-£10 per tub) Filling knife — 75mm and 150mm widths (£8-£15 from Screwfix) Fine sandpaper — 120 grit and 180 grit (£3-£5) Paintbrush for dusting and applying mist coat Decorator’s sponge for smoothing and blending Mist coat paint — white emulsion diluted 70/30 with water For Larger Cracks (2-5mm): Crack rake or scraper to widen and clean the crack (£5-£8) Scrim tape or fibreglass mesh (£4-£7 per roll from Wickes) Bonding plaster or filler — Gyproc EasiFill or similar (£8-£15 per bag) Filling knives — multiple sizes from 75mm to 200mm PVA solution for sealing (diluted 3:1 with water) Finishing plaster — Thistle Multi-Finish for final skim (£9-£12 per 25kg bag) Plasterer’s hawk and trowel for final finishing (£15-£35) For Major Replastering Work: Everything from the above lists, plus: Float and devil float for keying backing coats (£12-£20) Mixing paddle and drill for consistent plaster mixing (£15-£40) Bucket and water supply — clean water is essential Dust sheets and masking tape for protection Spirit level and straight edge to check flatness Pro Tip: Always buy slightly more material than you think you’ll need. A 25kg bag of finishing plaster covers roughly 10-12 square metres at 3mm thickness, but having extra on hand prevents mid-job trips to the builders’ merchants and allows for inevitable wastage. Unopened bags of multi-finish can last 3-4 months if stored properly in a dry location. Step-by-Step: Repairing Hairline Cracks Hairline cracks are the most common type we see, and fortunately they’re also the easiest to repair effectively. Here’s the professional method that delivers invisible, long-lasting results: Step 1: Clean and Prepare the Crack Use a dry paintbrush to remove all loose dust and debris from the crack. Don’t skip this

How to Repair Cracked Plaster Walls: Step-by-Step Guide Read More »

Common Plastering Problems and How to Fix Them

Quick Answer: Most plastering problems stem from poor preparation, incorrect mixing ratios, or rushing the drying process. The most common issues include cracking (caused by rapid drying, structural movement, or inadequate keying), delamination (poor suction control or contaminated backgrounds), bubbling (trapped air or moisture), and staining (water ingress or soluble salts). While minor surface cracks and small patches are DIY-friendly, extensive cracking, structural issues, or damp-related problems require professional assessment. Proper diagnosis is essential — treating symptoms without addressing the root cause will lead to recurring failures. Understanding Why Plastering Problems Occur After thirty years in the trade, I can tell you that most plastering defects aren’t random — they follow predictable patterns. The majority of problems I encounter on remedial jobs could have been prevented with proper preparation, correct material selection, and adequate drying time. Plastering is a system, not just slapping gypsum on a wall. Every component matters: the background substrate, the bonding agent, the plaster mix, ambient conditions, and the finishing technique. When one element fails, the entire system can break down. Understanding the root cause of plastering problems is crucial because treating symptoms without fixing the underlying issue leads to recurring defects. A crack filled with decorator’s caulk will reappear if structural movement continues. Stains will bleed through fresh paint if the moisture source isn’t eliminated. The Most Common Plastering Problems Based on thousands of remedial jobs across Kent, these are the defects I encounter most frequently: Cracking — from hairline surface crazing to structural cracks several millimetres wide Delamination — plaster losing adhesion and hollowing from the substrate Bubbling and blistering — trapped air or moisture creating raised areas Staining and discolouration — brown patches, efflorescence, or yellow marks bleeding through Poor finish quality — uneven surfaces, trowel marks, ridges, or excessive porosity Slow drying or persistent dampness — walls remaining soft or dark weeks after plastering Crumbling or powdery surfaces — weak plaster that dusts off or won’t take paint Let’s examine each problem in detail, diagnose the causes, and provide professional-grade solutions that actually work. Cracking: Types, Causes, and Solutions Not all cracks are created equal. The pattern, width, and location tell an experienced plasterer exactly what’s gone wrong. According to BRE (Building Research Establishment) guidance, cracks wider than 2mm indicate potential structural issues requiring investigation before cosmetic repairs. Map Cracking (Crazing) These fine surface cracks create a random network pattern resembling a road map. They’re typically shallow — less than 1mm deep — and purely cosmetic. Common causes: Excessive trowelling or over-working the surface during finishing Too-rapid drying due to hot weather, direct sunlight, or forced heating Incorrect water content in the final mix (too wet or too dry) Applying finishing plaster over an excessively porous background without proper suction control Using expired or contaminated plaster (British Gypsum products have a 4-month shelf life from manufacture) Professional fix: For minor crazing on multi-finish or board finish, a light mist-coat with diluted PVA (1:5 ratio) followed by a thin skim of fresh plaster will fill the network. For deeper crazing, scrape out loose material, apply a bonding agent, and patch with finishing plaster matched to the existing surface. Pro Tip: Never apply heat to accelerate drying in the first 48 hours. British Gypsum recommends maintaining temperatures between 13-18°C with good ventilation. Use a dehumidifier if conditions are humid, but avoid direct heat sources like fan heaters pointed at fresh plaster. Settlement Cracks These are straight or diagonal cracks, typically running from ceiling corners or around door frames. They indicate structural movement in the building fabric. Common causes: New build settlement (normal in properties under 12 months old) Foundation subsidence or heave due to clay soil movement Thermal expansion and contraction (especially in buildings with inadequate expansion joints) Lintel deflection above openings Removal of load-bearing walls without proper support ⚠️ Warning: Settlement cracks wider than 5mm, horizontal cracks in walls, or cracks that continue to widen require immediate structural engineer assessment. Don’t plaster over potentially dangerous structural defects. Building Regulations Part A (Structure) must be satisfied before cosmetic repairs. Professional fix: Monitor cracks for 6-12 months using tell-tales (glass or plastic markers). If movement has ceased, rake out cracks to 10mm depth, fill with a flexible filler like Everbuild StixAll or CT1, then apply scrim tape before skim coating. For active cracks, flexible crack bridging systems are necessary. For further guidance on structural concerns, our article on why plaster cracks and prevention methods covers this in depth. Shrinkage Cracks These appear as the plaster cures, typically within 24-72 hours. They often run along joints between plasterboards or where different materials meet. Common causes: Excessively thick coats (over 15mm in one application) High-suction backgrounds not adequately controlled Rapid moisture loss during curing Missing or improperly installed scrim tape at board joints Incompatible backing materials with different expansion coefficients Professional fix: Prevention is key. Apply proper scrim tape to all plasterboard joints before the first coat. For remedial work, cut out the crack in a V-shape, apply scrim, and fill with easy-fill compound (Gyproc EasiFill is excellent for this). Two thin coats are always better than one thick application. Delamination and Hollow Plaster Delamination occurs when plaster loses adhesion to the background substrate. You’ll hear a hollow sound when tapping affected areas — a dead giveaway that the plaster’s about to fail catastrophically. Primary causes: Poor suction control — plastering onto bone-dry backgrounds or non-absorbent surfaces without proper preparation Contaminated substrates — dust, paint, wallpaper paste, or grease preventing mechanical key Wrong backing coat — using finishing plaster on unsuitable backgrounds (it needs undercoat plaster or bonding first) Frozen plaster — mixing or applying below 5°C causes crystals to form, destroying bond strength Movement differential — new plaster applied over incompatible materials (timber to masonry transitions without proper detailing) Background Type Preparation Required Bonding Agent Painted walls Remove loose paint, score surface, wash down Blue Grit or Thistle Bond-It Engineering bricks Hose down to saturate Thistle Bond-It neat coat Plasterboard (grey side) Check all fixings,

Common Plastering Problems and How to Fix Them Read More »