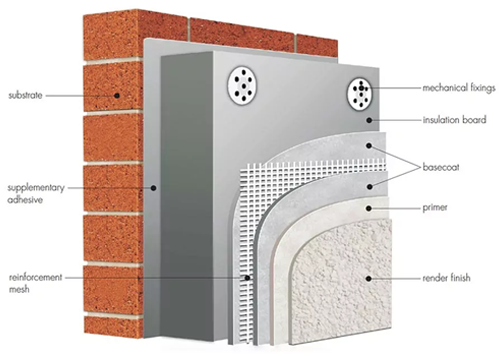
Transform your tired brick wall into a smooth, professional finish with our expert guide on how to render a brick wall – discover the techniques that master plasterers don’t want you to know.
Understanding Brick Wall Rendering: The Essentials
Rendering a brick wall is a skilled process that involves applying a mixture of sand, cement, and often lime to create a protective and aesthetically pleasing surface finish. This technique not only enhances the appearance of your property but also provides additional weather protection and insulation. Modern rendering has evolved significantly, with recent studies showing that properly rendered walls can improve thermal efficiency by up to 15%. The process requires careful preparation, precise application techniques, and proper curing time to achieve optimal results.
Essential Tools and Materials for Rendering
- Rendering materials: Portland cement, building sand, hydrated lime
- Mixing equipment: Paddle mixer, mixing buckets, wheelbarrow
- Application tools: Hawk, steel trowel, plastic float, wooden float
- Preparation supplies: Wire brush, pressure washer, masking tape
- Safety equipment: Protective goggles, dust mask, gloves
- Miscellaneous: Spirit level, straight edge, scoring tool
Preparing Your Brick Wall for Rendering
Proper preparation is crucial for achieving a lasting render finish. Start by thoroughly inspecting the wall for any structural issues or damp problems. Statistics show that 80% of rendering failures are due to inadequate surface preparation. Remove any loose bricks, repair damaged mortar joints, and ensure the wall is completely clean and free from dust, dirt, and organic growth. For older walls, apply a fungicidal wash and allow it to dry completely. If the surface is particularly smooth or non-porous, consider applying a bonding agent to improve adhesion.
Step-by-Step Guide to Rendering Your Brick Wall
1. Surface Preparation and Cleaning
Begin by dampening the wall slightly to prevent the bricks from absorbing too much moisture from the render. Apply masking tape to protect adjacent surfaces and ensure straight edges. Check that all repairs have fully cured before proceeding.
2. Applying the Scratch Coat
Mix your first coat using a 6:1:1 ratio of sand, cement, and lime. Apply this scratch coat to a thickness of approximately 10mm, using firm pressure to ensure good adhesion. Score the surface horizontally with a scratch comb to create a key for the second coat. Allow this layer to set for 24-48 hours.
3. Creating the Float Coat
Apply the second coat using a slightly different mix ratio of 7:1:1. This layer should be approximately 8mm thick and applied evenly across the wall. Use a straight edge to check for any hollows or high spots.
4. Achieving the Perfect Finish
Once the float coat has firmed up slightly, use a plastic float in circular motions to achieve a smooth finish. For textured finishes, use specific techniques or tools depending on your desired effect.
Expert Tips for Perfect Rendering Results
- Always mix render in small batches to prevent it setting before application
- Maintain consistent moisture levels throughout the process
- Work in sections to ensure wet edges are maintained
- Avoid rendering in extreme weather conditions
- Use corner beads for crisp, straight edges
- Consider using fibres in the mix for added strength
Common Rendering Mistakes and How to Avoid Them
The most frequent rendering errors include incorrect mixing ratios, applying render too thickly, and poor weather timing. Recent industry data indicates that 35% of DIY rendering projects require professional intervention due to these common mistakes. Ensure proper curing between coats, maintain consistent thickness, and avoid rendering in direct sunlight or strong winds.
Alternative Rendering Techniques and Finishes
Modern rendering offers various options beyond traditional sand and cement. Consider these contemporary alternatives:
- Acrylic renders: Flexible and weather-resistant
- Monocouche renders: Single-coat application
- Lime renders: Ideal for period properties
- Polymer-modified renders: Enhanced durability
Aftercare and Maintenance
Proper maintenance can extend the life of your rendered wall significantly. Regular inspections, gentle cleaning, and prompt repairs of any cracks or damage are essential. Studies show that well-maintained renders can last up to 30 years. Consider applying a protective coating or paint system designed specifically for rendered surfaces.
When to Call in the Professionals
While rendering can be a DIY project, certain situations warrant professional intervention. Complex or large-scale projects, heritage properties, or walls requiring significant repair should be handled by experienced plasterers. At Kent Plasterers, we bring over two decades of expertise to every project, ensuring flawless results and long-lasting finishes. Contact us for a free consultation if you’re unsure about tackling your rendering project alone.
FAQ
What’s the best mix for rendering?
As mentioned, above, the correct mix widely used by plasterers is a 6:1:1 ratio of sand, cement, and lime for external wall rendering. Some people prefer 4:1:1 mortar mixes, although this is not as widely used for exterior walls.
Do I need to prime concrete blocks before rendering?
When installing render onto block, you should be sure to prime it correctly. This ensures the new render will last by aiding adhesion between the basecoat layer and the block. For the primer, we recommend using a roller or brush to apply the EWI-302 Deep Penetrating Primer as it is ideal for stabilising the walls.
Why is my sand and cement render not sticking?
There could be dirt, dust, oil, mud, or any other debris on the walls which can cause the render to not stick properly. Therefore, you need to ensure the wall is cleaned and dried thoroughly before applying the cement render so they bind firmly.
Can you render with just sand and cement?
Sand and cement render is a relatively simple and cost-effective option for finishing the exterior of a building, and can be used to achieve a variety of looks, from traditional to modern.
Is rendering brick a good idea?
Rendering also has another key advantage: layering your builder’s exterior helps prevent the exposed brick from cracking and erosion, which can save you from having to pay for expensive maintenance.
Sources
[1] https://www.youtube.com/watch?v=-O5r4NhIwSI
[2] https://www.youtube.com/watch?v=oUf15aMzH3g
[3] https://www.youtube.com/watch?v=ThcIIDGN08Q

