
The Ultimate Guide to Properly Mixing Plaster
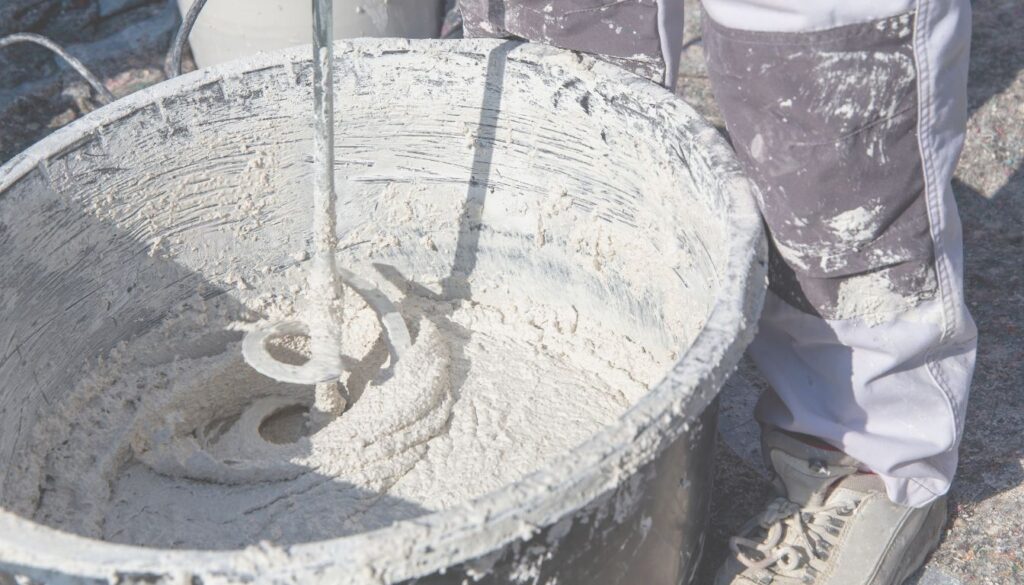
Quick Answer: The secret to perfectly mixed plaster is simple: always add plaster to water (never water to plaster), mix for 2-3 minutes at 400-600 RPM until you achieve a thick yogurt consistency, and work within 30-60 minutes. Use cool water (10-18°C), a clean bucket, and a drill mixer for professional results every time. Ever wondered why some walls have a flawless finish while others appear patchy and uneven? The secret often lies in the consistency of the plaster used. Achieving the perfect mix is not just about following steps; it’s about understanding the science behind it. Whether you’re a DIY enthusiast or a professional, mastering this skill can make all the difference in your plastering projects. One common mistake is adding water to plaster instead of the other way around. This can lead to lumps and an uneven texture that compromises both aesthetics and structural integrity. Experts recommend starting with water and gradually adding plaster to achieve a smooth, creamy consistency. This method ensures a flawless finish and makes the application process much easier, according to WikiHow’s comprehensive plaster mixing guide. According to USG Corporation, one of the world’s leading manufacturers of gypsum products, proper mixing technique reduces material waste by up to 20% and significantly improves workability. Proper mixing is not just about technique; it’s also about timing. Plaster has a limited working time, typically between 30 to 60 minutes, depending on the type and environmental conditions. As of 2026, modern gypsum-based plasters from manufacturers like British Gypsum have improved formulations that extend working time by approximately 10-15% compared to 2024 products. Mixing too quickly or too slowly can affect the final result. By following these expert tips from Gypsum Tools’ step-by-step mixing guide, you can avoid common pitfalls and achieve professional-quality results every time. If you have any further questions, feel free to reach out to Kent Plasterers. We’re here to help you every step of the way. Key Takeaways Always add plaster to water gradually to avoid lumps and achieve optimal consistency Target consistency: smooth, creamy texture resembling thick yogurt for the best results Mixing time: 2-3 minutes with a drill mixer at 400-600 RPM is crucial for a flawless finish Working time: 30-60 minutes for most types, so plan your application accordingly Water temperature: use fresh, cool water between 10-18°C for optimal performance Modern formulations: 2026 products offer extended working times and improved characteristics Expert guidance available: Contact Kent Plasterers for professional assistance with your projects Preparing Your Materials and Work Area Proper preparation is the cornerstone of any successful plastering project. Before you begin, it’s essential to gather all the necessary tools and ingredients. This ensures a smooth workflow and minimises disruptions during the process. According to OSHA construction safety guidelines, proper workspace preparation reduces accident rates by up to 40% and improves overall project efficiency. Gathering the Essential Tools and Ingredients Start by selecting a clean, sturdy bucket of sufficient size, ideally between 5 to 7 gallons (approximately 19 to 27 litres). This allows for proper mixing and reduces splatter. Ensure you have fresh, cool water ready—water temperature should be between 10-18°C (50-65°F) for optimal results. Contaminated or warm water can significantly affect the plaster’s setting time and final strength, as detailed in Gypsum Tools’ mixing techniques guide. Measure the correct amount of plaster from the bag to avoid wastage. For instance, beginners should use around half a bag (typically 12.5kg for a standard 25kg bag) to practice before it sets. Having all tools at hand saves time and effort. In 2026, professional plasterers increasingly use variable-speed cordless drills with torque settings specifically designed for plaster mixing, which provide better control and reduce arm fatigue during extended projects. Pro Tip: Before you start mixing plaster, review our guide on applying your first coat of plaster to understand the complete preparation process from surface prep to application technique. Essential Tool Specification Purpose Mixing Bucket 5-7 gallons (19-27 litres) Proper volume for consistent mixing Drill Mixer Variable speed, 400-600 RPM Achieves lump-free consistency Mixing Paddle Stainless steel spiral, 120-140mm Thorough material incorporation Water Fresh, cool (10-18°C) Optimal hydration and setting time Plaster Fresh bag, properly stored Quality final finish Setting Up a Safe and Organised Workspace Safety and organisation are paramount. Clear the work area of obstacles and lay down protective sheeting to keep surfaces clean. A well-ventilated space is crucial, especially when working indoors, as gypsum dust can irritate respiratory systems. According to the UK Health and Safety Executive, proper ventilation and dust control measures should be implemented on all plastering jobs to comply with current 2026 construction safety regulations. Use painter’s tape to secure drop cloths and protect edges. For example, external angle beads help in tight corners, while stop beads control plaster application on edges, as explained in MyJobQuote’s comprehensive plastering guide. An organised workspace not only enhances efficiency but also ensures a smoother finish. Professional plasterers in 2026 often use LED work lights with colour-accurate lighting (CRI 90+) to better identify surface imperfections during application. This represents a significant improvement over traditional lighting methods and helps achieve professional results more consistently. Clear the workspace: Remove obstacles and ensure adequate floor space for materials and movement Lay protective sheeting: Use heavy-duty canvas or reusable plastic drop cloths to protect floors and furniture Secure edges: Apply low-tack painter’s tape to protect trim, fixtures, and adjacent surfaces Ensure ventilation: Open windows and use fans to maintain air circulation and reduce dust exposure Arrange materials: Stage plaster bags, water, and tools within easy reach before mixing begins Wear PPE: Safety glasses, FFP2 dust mask, and protective gloves are essential for every plastering job Remember, thorough preparation sets the foundation for a successful plastering job. If you need further clarification or are planning a complete renovation involving plastering work, feel free to contact us at Kent Plasterers. We’re here to guide you every step of the way with expert advice based on decades of experience across Kent. Mastering How to Mix Plaster: Step-by-Step Process Achieving
The Ultimate Guide to Properly Mixing Plaster Read More »