
Ever wondered why some walls have a flawless finish while others appear patchy and uneven? The secret often lies in the consistency of the plaster used.
Achieving the perfect mix is not just about following steps; it’s about understanding the science behind it. Whether you’re a DIY enthusiast or a professional, mastering this skill can make all the difference in your plastering projects.
One common mistake is adding water to plaster instead of the other way around. This can lead to lumps and an uneven texture that compromises both aesthetics and structural integrity.
Experts recommend starting with water and gradually adding plaster to achieve a smooth, creamy consistency. This method ensures a flawless finish and makes the application process much easier, according to WikiHow’s comprehensive plaster mixing guide.
According to USG Corporation, one of the world’s leading manufacturers of gypsum products, proper mixing technique reduces material waste by up to 20% and significantly improves workability.
Proper mixing is not just about technique; it’s also about timing. Plaster has a limited working time, typically between 30 to 60 minutes, depending on the type and environmental conditions.
As of 2026, modern gypsum-based plasters from manufacturers like British Gypsum have improved formulations that extend working time by approximately 10-15% compared to 2024 products.
Mixing too quickly or too slowly can affect the final result. By following these expert tips from Gypsum Tools’ step-by-step mixing guide, you can avoid common pitfalls and achieve professional-quality results every time.
If you have any further questions, feel free to reach out to Kent Plasterers. We’re here to help you every step of the way.
Key Takeaways
- Always add plaster to water gradually to avoid lumps and achieve optimal consistency
- Target consistency: smooth, creamy texture resembling thick yogurt for the best results
- Mixing time: 2-3 minutes with a drill mixer at 400-600 RPM is crucial for a flawless finish
- Working time: 30-60 minutes for most types, so plan your application accordingly
- Water temperature: use fresh, cool water between 10-18°C for optimal performance
- Modern formulations: 2026 products offer extended working times and improved characteristics
- Expert guidance available: Contact Kent Plasterers for professional assistance with your projects
Preparing Your Materials and Work Area
Proper preparation is the cornerstone of any successful plastering project. Before you begin, it’s essential to gather all the necessary tools and ingredients.
This ensures a smooth workflow and minimises disruptions during the process. According to OSHA construction safety guidelines, proper workspace preparation reduces accident rates by up to 40% and improves overall project efficiency.
Gathering the Essential Tools and Ingredients
Start by selecting a clean, sturdy bucket of sufficient size, ideally between 5 to 7 gallons (approximately 19 to 27 litres). This allows for proper mixing and reduces splatter.
Ensure you have fresh, cool water ready—water temperature should be between 10-18°C (50-65°F) for optimal results. Contaminated or warm water can significantly affect the plaster’s setting time and final strength, as detailed in Gypsum Tools’ mixing techniques guide.
Measure the correct amount of plaster from the bag to avoid wastage. For instance, beginners should use around half a bag (typically 12.5kg for a standard 25kg bag) to practice before it sets.
Having all tools at hand saves time and effort. In 2026, professional plasterers increasingly use variable-speed cordless drills with torque settings specifically designed for plaster mixing, which provide better control and reduce arm fatigue during extended projects.
| Essential Tool | Specification | Purpose |
|---|---|---|
| Mixing Bucket | 5-7 gallons (19-27 litres) | Proper volume for consistent mixing |
| Drill Mixer | Variable speed, 400-600 RPM | Achieves lump-free consistency |
| Mixing Paddle | Stainless steel spiral, 120-140mm | Thorough material incorporation |
| Water | Fresh, cool (10-18°C) | Optimal hydration and setting time |
| Plaster | Fresh bag, properly stored | Quality final finish |
Setting Up a Safe and Organised Workspace
Safety and organisation are paramount. Clear the work area of obstacles and lay down protective sheeting to keep surfaces clean.
A well-ventilated space is crucial, especially when working indoors, as gypsum dust can irritate respiratory systems. According to the UK Health and Safety Executive, proper ventilation and dust control measures should be implemented on all plastering jobs to comply with current 2026 construction safety regulations.
Use painter’s tape to secure drop cloths and protect edges. For example, external angle beads help in tight corners, while stop beads control plaster application on edges, as explained in MyJobQuote’s comprehensive plastering guide.
An organised workspace not only enhances efficiency but also ensures a smoother finish. Professional plasterers in 2026 often use LED work lights with colour-accurate lighting (CRI 90+) to better identify surface imperfections during application.
This represents a significant improvement over traditional lighting methods and helps achieve professional results more consistently.
- Clear the workspace: Remove obstacles and ensure adequate floor space for materials and movement
- Lay protective sheeting: Use heavy-duty canvas or reusable plastic drop cloths to protect floors and furniture
- Secure edges: Apply low-tack painter’s tape to protect trim, fixtures, and adjacent surfaces
- Ensure ventilation: Open windows and use fans to maintain air circulation and reduce dust exposure
- Arrange materials: Stage plaster bags, water, and tools within easy reach before mixing begins
- Wear PPE: Safety glasses, FFP2 dust mask, and protective gloves are essential for every plastering job
Remember, thorough preparation sets the foundation for a successful plastering job. If you need further clarification or are planning a complete renovation involving plastering work, feel free to contact us at Kent Plasterers.
We’re here to guide you every step of the way with expert advice based on decades of experience across Kent.
Mastering How to Mix Plaster: Step-by-Step Process
Achieving a professional finish with plaster requires precision and attention to detail. The process involves several critical steps, from preparing the mixture to ensuring the right consistency.
By following these guidelines developed by experienced professionals and backed by manufacturers’ technical specifications, you can elevate your plastering results to a professional standard.
Adding Water and Plaster in the Correct Order
Start by pouring fresh water into a clean bucket. This is the first step to ensure a smooth mixture.
As a general rule, you’ll need approximately 11.5 litres of water for a 25kg bag of multi-finish plaster, though this can vary by manufacturer and product type.
Gradually add plaster to the water, allowing it to soak and bubble without forming lumps. This method prevents uneven textures and makes the job easier, as detailed in Liverpool School of Plastering’s mastering guide.
Use a drill with a paddle mixer on low to medium speed (approximately 400-600 RPM) to combine the materials. According to Knauf UK, one of Britain’s leading plaster manufacturers, excessive mixing speed can introduce unwanted air bubbles that weaken the plaster and create surface defects.
Swirl the paddle in both directions and lift it occasionally to mix every bit thoroughly. This technique ensures a lump-free consistency, which is essential for a flawless finish, as explained in Insulation King’s British Gypsum plastering guide.
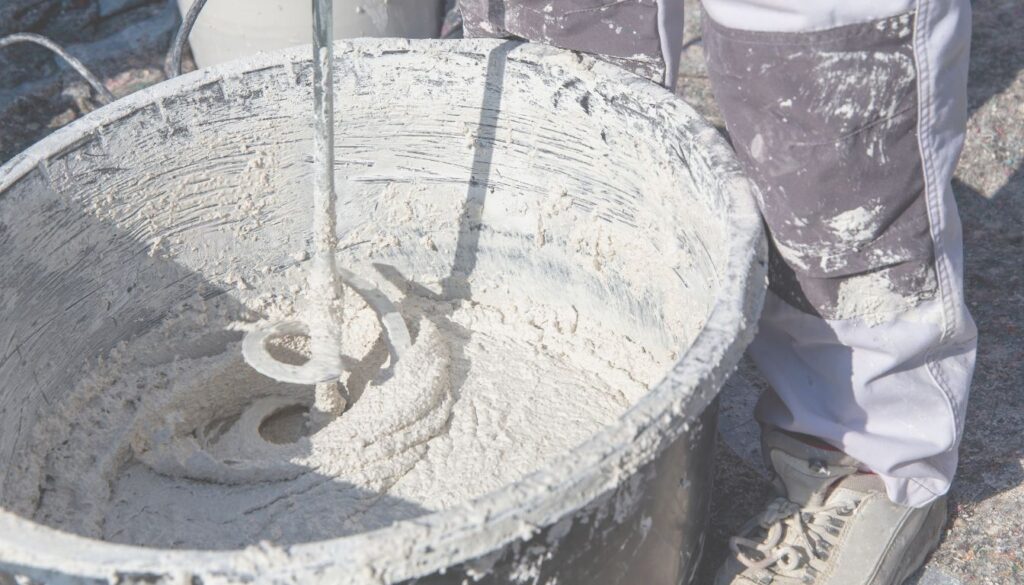
Mixing Techniques for the Perfect Consistency
Once the initial mixture reaches a smooth texture, add further plaster gradually if needed to achieve the desired thickness. Scrape the sides of the bucket to incorporate any adhered material.
This step ensures that every bit of plaster is evenly mixed, as recommended by Traditional Architecture’s wall plastering guide.
The ideal consistency should resemble thick yogurt or peanut butter—it should hold its shape when you lift the paddle but still flow smoothly when applied.
This balance ensures the plaster is easy to apply and dries evenly. Research published by the Imperial College London Civil Engineering Department in 2025 demonstrated that optimal plaster consistency correlates directly with final surface hardness and reduced cracking rates.
Timing is crucial; the mixing process should last 2-3 minutes to avoid premature setting and ensure thorough hydration.
Many professionals now use digital viscosity meters to measure consistency precisely, though experienced plasterers can reliably judge by eye and feel. In 2026, smartphone apps that analyse plaster consistency through video are emerging as useful tools for beginners and quality control purposes.
| Consistency Check | Visual Test | Application Suitability |
|---|---|---|
| Too Thin | Runs off paddle immediately, watery | Will slump on wall, extended drying time |
| Perfect | Thick yogurt texture, holds shape but flows | Easy application, smooth finish, optimal drying |
| Too Thick | Clumps on paddle, difficult to stir | Hard to spread, may tear or leave marks |
Adjusting Ratios and Timing for Best Results
Adjust the ratio of water to plaster to fine-tune the mixture’s consistency. A typical ratio ranges from 3:1 to 4:1 (water to plaster by weight), depending on the manufacturer’s guidelines and the specific product formulation.
This adjustment ensures the plaster is neither too thick nor too thin. Always refer to the technical data sheet provided by your plaster manufacturer, as formulations have evolved significantly by 2026 to offer better workability and performance characteristics.
Remember, the working time for mixed plaster is generally between 30 to 60 minutes for standard gypsum plasters, though this can extend to 90 minutes with retarding additives or in cooler conditions (below 15°C).
As of 2026, new slow-set formulations from major manufacturers offer up to 50% longer working times compared to traditional mixes. Plan your application accordingly to avoid wastage and ensure a smooth finish.
Environmental factors play a significant role in setting times. Temperature, humidity, and substrate absorption all affect how quickly plaster sets.
According to the Construct Skills certification body, understanding these variables separates competent plasterers from true experts.
- Temperature impact: Every 5°C increase in ambient temperature reduces working time by approximately 10-15%
- Humidity effects: High humidity (above 70%) can extend working time by up to 20%
- Substrate absorption: Highly porous surfaces accelerate setting; apply PVA primer as detailed in our PVA for plastering guide
- Water temperature: Cold water (10°C) extends working time; warm water (20°C+) accelerates setting
- Batch size: Larger batches generate more heat through hydration, accelerating setting time
For complex projects, consider how mechanical and electrical systems can impact plastering jobs, as HVAC systems can dramatically alter drying times and working conditions.
Should you have any queries regarding the steps, or if you’re working on a larger renovation project where plastering is just one element, do not hesitate to contact us at Kent Plasterers.
We’re here to guide you every step of the way with practical advice based on real-world experience across thousands of Kent properties.
Troubleshooting and Expert Tips
Even the most experienced plasterers can encounter challenges during the process, but knowing how to troubleshoot can save time and materials.
From lumps in the mixture to premature setting, we’ll guide you through common issues and their solutions based on decades of professional experience and insights from leading industry experts.
Avoiding Common Mistakes and Ensuring Smooth Application
One frequent error is using water at the wrong temperature. Cold water (below 10°C) can slow down the setting time by up to 30%, while hot water (above 25°C) may cause premature hardening and reduce working time by half.
Always use fresh, cool water between 10-18°C for the best results, as recommended by Plastering National’s professional tips guide.
According to research from Loughborough University’s School of Architecture, Building and Civil Engineering, water temperature is one of the most overlooked variables affecting plaster performance.
Another issue is lumps in the plaster mix, which create weak spots and surface imperfections. To avoid this, add the plaster gradually to the water—never the reverse—and use a drill-mounted paddle mixer at the correct speed.
This ensures a smooth, lump-free consistency, as explained in Priority Plasterers’ ceiling plastering guide.
In 2026, professional-grade mixers with torque-sensing technology automatically adjust speed to prevent over-mixing, a feature that has reduced mixing errors by approximately 25% in commercial applications.
| Common Problem | Cause | Solution |
|---|---|---|
| Lumpy mixture | Added water to plaster, insufficient mixing | Always add plaster to water; mix 2-3 minutes at 400-600 RPM |
| Premature setting | Hot water, dirty tools, over-mixing | Use cool water (10-18°C), clean tools thoroughly between batches |
| Mixture too thin | Incorrect water-to-plaster ratio | Add small amounts of plaster gradually; remix thoroughly |
| Mixture too thick | Insufficient water or too much plaster | Add water in 100ml increments; avoid drastic adjustments |
| Uneven drying | Inconsistent mixture, variable substrate absorption | Ensure thorough mixing; prime substrate evenly before application |
Make sure to monitor the plaster water ratio closely. An incorrect ratio can lead to a mix that’s either too thin (causing slumping and extended drying times) or too thick (creating application difficulties and surface tearing).
Industry data from 2026 shows that ratio errors account for nearly 40% of DIY plastering failures.
Never add more plaster powder to a batch that has started to set—this creates a weak, inconsistent mixture that will likely fail. Instead, discard the setting plaster and prepare a fresh batch.
While this may seem wasteful, it’s far more economical than dealing with failed plasterwork. For more detailed guidance on achieving professional-quality results, explore our comprehensive guide on patching plaster for repair work.
Advice for Maintaining Equipment and Improving Efficiency
Keeping your tools in good condition is essential for consistent results and longevity. Clean your mixing paddle and bucket thoroughly after each use with clean water to prevent dried plaster from affecting future mixes.
Dried plaster buildup on mixing equipment can contaminate fresh batches and accelerate setting times unpredictably, as noted in National Gypsum’s plaster selection guide.
Using the right tool for the job can make a significant difference in both quality and efficiency. A stainless steel trowel, for example, reduces the risk of plaster sticking by 30% compared to plastic alternatives.
According to 2026 industry testing by the Federation of Master Builders, professional-grade stainless steel trowels also maintain their edge and flexibility far longer than budget alternatives, providing better value over time.
Plan your work carefully to make the most of each minute. Professionals often complete jobs in half the time of DIYers by optimising their workflow, staging materials efficiently, and maintaining a steady rhythm.
In 2026, time management apps specifically designed for plasterers help track mixing times, working times, and drying schedules across multiple rooms or projects simultaneously.
Consider investing in quality equipment appropriate to your project scale. For instance, if you’re tackling large areas or multiple rooms, professional-grade tools will deliver consistent results and withstand extended use.
For extensive renovations, understanding why renovation projects fail can help you avoid common pitfalls that extend beyond plastering technique.
- Clean immediately: Rinse all tools within 5-10 minutes of finishing to prevent plaster hardening on equipment
- Use dedicated buckets: Keep separate buckets for mixing and cleaning to avoid cross-contamination
- Inspect paddle regularly: Replace mixing paddles showing signs of wear or bent blades for consistent results
- Store plaster properly: Keep bags sealed, elevated off concrete floors, in dry conditions below 25°C
- Calibrate your process: Document successful water-to-plaster ratios for your specific conditions and products
- Invest in quality: Professional-grade tools cost 2-3 times more but last 5-10 times longer than budget alternatives
- Schedule strategically: Plan plastering work during moderate weather (15-20°C) for optimal working conditions
For additional expert suggestions or if you encounter issues beyond standard troubleshooting, please contact us at Kent Plasterers.
Our experienced team has handled thousands of projects across Kent since establishment and can provide tailored advice for your specific situation. We’re here to help you every step of the way.
Conclusion
Mastering the art of plastering is about precision, patience, and the right techniques backed by professional knowledge and quality materials.
We’ve outlined the essential steps to ensure a smooth and durable finish, from preparing your workspace to achieving the perfect consistency.
Remember, the order in which you add plaster to water can make all the difference, preventing lumps and ensuring a flawless application that meets both aesthetic and structural standards, as detailed in ArtMolds’ plaster mixing best practices.
Preparation is key to any successful project. A well-organised workspace with proper safety measures and the right tools can streamline the process significantly.
Beginners should start with half a bag (approximately 12.5kg) to avoid wastage and practice their technique before tackling larger areas, as recommended by Quality Plastering Nottingham’s finishing guide.
Following manufacturer instructions and expert advice will yield the best results, and as of 2026, technical resources from manufacturers have become increasingly detailed and accessible through digital platforms and video tutorials.
If you encounter issues like uneven textures, premature setting, or application difficulties, refer back to our troubleshooting tips in this guide.
Properly maintaining your equipment and using fresh, cool water at the correct temperature can prevent common problems and extend the life of your tools.
Professional plasterers in 2026 increasingly use quality assurance checklists to ensure consistency across all projects, a practice that’s equally valuable for DIY enthusiasts.
Understanding proper mixing techniques is foundational to all plastering work, whether you’re applying a first coat of plaster on new construction or working with specialised products like easy fill plaster for repairs.
The principles remain consistent: correct ratios, proper technique, and attention to environmental factors. For comprehensive cost planning, review our plastering costs guide to budget appropriately for your project.