Lime Plaster Walls: Transform Your Period Property
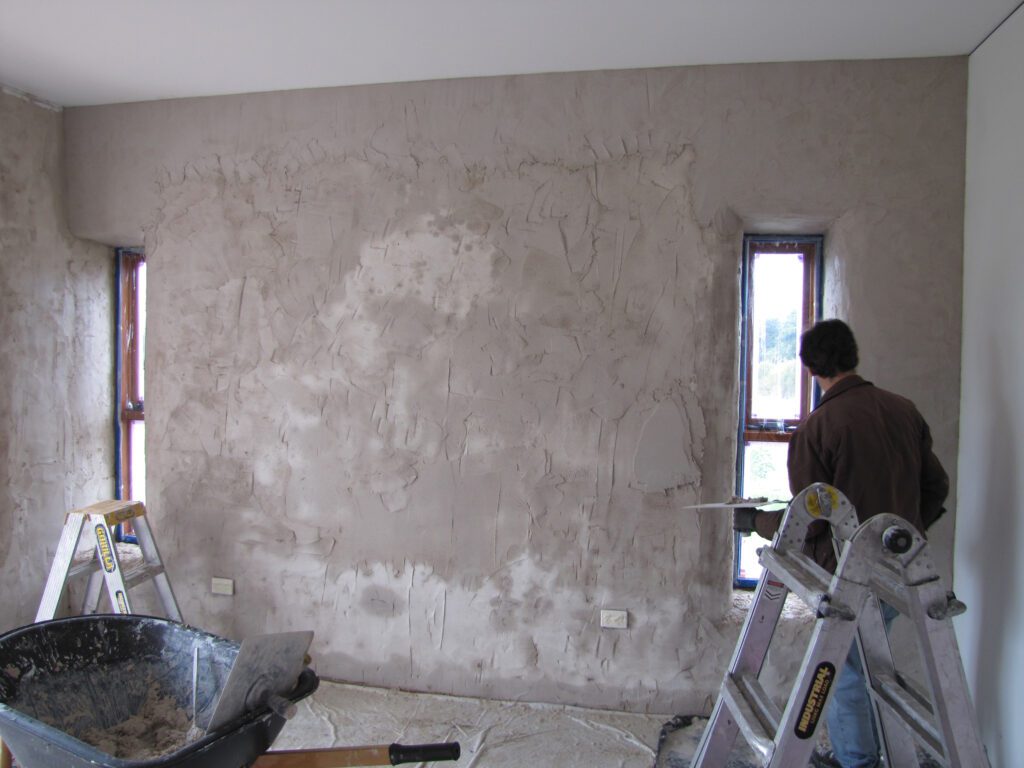
Discover why lime plaster walls are the secret to achieving authenticity and breathability in heritage homes, backed by centuries of architectural wisdom. Understanding Lime Plaster: A Time-Tested Building Material Lime plaster has been a cornerstone of construction for millennia, with examples of its use dating back to ancient civilisations. Today, it remains highly valued in heritage restoration and eco-conscious building projects across the UK. At its core, lime plaster consists of lime putty or hydraulic lime mixed with carefully selected aggregates, primarily sand, and sometimes natural fibres for enhanced durability. Recent studies show that over 75% of pre-1919 buildings in Britain were constructed using lime-based materials, underlining its historical significance and proven longevity. The key distinction between lime plaster and modern alternatives lies in its composition and behaviour. Unlike cement-based products, lime plaster works in harmony with traditional building materials, allowing structures to ‘breathe’ naturally. This characteristic makes it particularly valuable for heritage properties, where maintaining structural integrity while preserving historical authenticity is paramount. The Benefits of Lime Plaster Walls Superior Breathability and Moisture Control One of the most significant advantages of lime plaster walls is their exceptional ability to manage moisture. Research indicates that lime plaster can absorb up to 40% more moisture than conventional plasters, effectively regulating indoor humidity levels. This natural breathability helps prevent common issues in older properties, such as: Reduction in condensation and mould growth Prevention of trapped moisture within walls Enhanced internal air quality Protection against frost damage Improved thermal efficiency Environmental Advantages In today’s climate-conscious world, lime plaster stands out for its impressive environmental credentials. The production of lime plaster generates approximately 20% less CO2 compared to cement-based alternatives. Moreover, lime plaster actually absorbs CO2 during its curing process, making it an increasingly popular choice for eco-conscious homeowners. Additional environmental benefits include: Natural and sustainable raw materials Lower embodied energy in production Ability to be recycled or returned to the earth Zero volatile organic compounds (VOCs) Historical Authenticity and Character For period property owners, maintaining historical authenticity is crucial. Lime plaster provides an unmatched aesthetic that modern materials simply cannot replicate. Its subtle texture and natural variations create depth and character that enhance the historical value of heritage buildings. The material ages gracefully, developing a patina that adds to its charm over time. The Three-Coat System Explained The Scratch Coat Foundation The initial scratch coat serves as the crucial foundation for lime plaster walls. This first layer, typically mixed at a ratio of 1:2.5 lime to sand, creates a strong bond with the underlying substrate. The surface is deliberately scratched to provide key for the subsequent coat. Professional application requires careful attention to thickness, typically 8-10mm, to ensure optimal performance. The Float Coat Structure Mix ratio: 1:3 lime to sand Thickness: 6-8mm application Purpose: Builds out wall plane and provides strength Technique: Applied once scratch coat has partially set Finish: Lightly textured to receive final coat The Final Skim Coat The finishing coat, mixed at a ratio of 1:1.5 lime to fine sand, determines the final appearance of your walls. This layer can be worked to achieve various finishes, from smooth and polished to subtly textured. The application technique and timing are crucial for achieving the desired result. Application Techniques and Best Practices Surface Preparation Proper preparation is essential for successful lime plastering. Different substrates require specific approaches: Stone walls: Remove any loose material and dampen thoroughly Brick surfaces: Clean thoroughly and check for salt contamination Timber lath: Ensure stability and even spacing Previous plaster: Test for soundness and compatibility Mixing and Application Methods Success with lime plaster depends heavily on proper mixing and application techniques. Research shows that incorrect mixing ratios account for 40% of lime plaster failures. Essential considerations include: Use clean, sharp sand free from organic matter Mix thoroughly but avoid over-mixing Maintain consistent water content Apply with firm pressure using appropriate tools Work in manageable sections Curing and Maintenance Understanding Setting Times Lime plaster requires patience during the curing process. The initial set might take 24-48 hours, but full carbonation can extend over several months. Environmental conditions significantly impact curing times: Temperature: Ideal range 5-25°C Humidity: 60-80% relative humidity Ventilation: Good air flow essential Protection: Shield from direct sun and strong winds Long-term Care With proper maintenance, lime plaster walls can last for centuries. Regular care involves: Annual visual inspections for damage Prompt repair of any cracks or damage Use of breathable paints and finishes Maintaining good ventilation Avoiding modern sealants or impermeable coatings Making the Right Choice for Your Property Choosing lime plaster for your walls represents an investment in your property’s future. While the initial costs may be higher than modern alternatives, the long-term benefits far outweigh the investment. Properties with properly maintained lime plaster walls have shown up to 15% higher market values compared to those with modern plaster systems. For heritage homeowners in Kent and the surrounding areas, lime plaster offers the perfect balance of historical authenticity, environmental responsibility, and practical performance. Contact our experienced team at Kent Plasterers to discuss how we can help preserve and enhance your property with traditional lime plastering techniques. FAQ Do you need to seal lime plaster? One or two coats of sealer are recommended depending on the area. Allow the sealer to dry completely in between coats. NOTE: Allow the final coat of Tadelakt, lime plaster or lime paint surfaces to dry/ cure at least for 2-3 days before applying the sealer on top. Can lime plaster grow mold? Mould growth inside lime plaster is observed if the moisture transfer is obstructed by any surface coating, object, or lack of ventilation. If lime plaster is allowed to breathe, favourable conditions for mould growth can be avoided. Does lime plaster crack? In carbonation of lime can only take place in the presence of water. It can years for a new plaster/render to reach its full strength. If plaster/render dries before sufficient carbonation has taken place then cracking can occur. How long will lime plaster last? When properly applied
Lime Plaster Walls: Transform Your Period Property Read More »