Insulating Plaster: Energy-Efficient Homes Guide
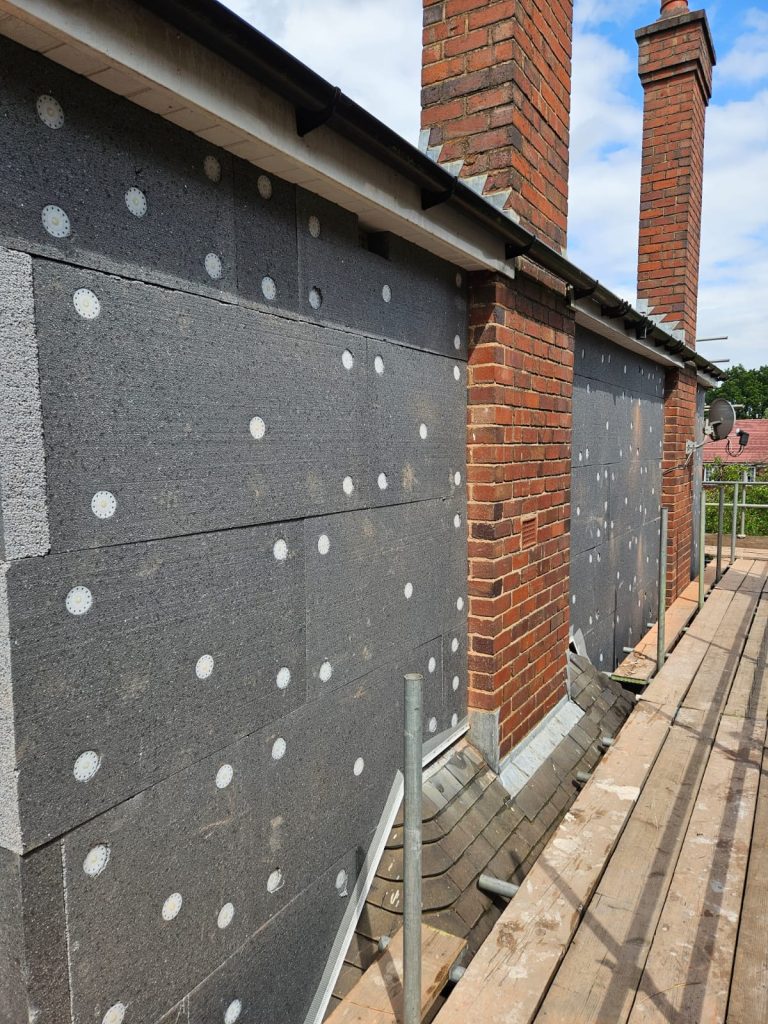
Quick Answer: Insulating plaster combines traditional plastering with advanced thermal materials (cork, perlite, clay) to reduce heat loss by up to 30%. It costs £25-45 per square metre and can save UK homeowners up to £350 annually on heating bills, with a typical payback period of 3-5 years. Professional installation is essential for optimal results. Transform your home’s comfort with insulating plaster – the modern solution that’s revolutionising energy efficiency in British homes. Understanding Insulating Plaster: A Modern Solution for Energy Efficiency In today’s climate of soaring energy costs and growing environmental awareness, insulating plaster has emerged as a game-changing solution for UK homeowners. This innovative material combines traditional plastering techniques with advanced thermal properties, offering a practical way to enhance your home’s energy efficiency. Recent studies show that UK households could save up to £350 annually on heating bills through effective wall insulation. Insulating plaster works by incorporating special materials like cork, perlite, or clay into traditional plaster mixtures. This creates a barrier that significantly reduces heat loss while maintaining the aesthetic appeal of conventional plastered walls. The Science Behind Insulating Plaster The effectiveness of insulating plaster lies in its unique composition and scientific principles. At its core, insulating plaster utilises materials with low thermal conductivity values, typically ranging from 0.05 to 0.1 W/mK, compared to traditional plaster’s 0.8 W/mK. The primary components include: Natural or synthetic materials (cork granules, expanded perlite, or mineral aggregates) Lime or clay binders Millions of microscopic air pockets that trap heat These materials slow heat transfer through walls. The resulting thermal mass helps maintain stable indoor temperatures by absorbing excess heat during warm periods and releasing it when temperatures drop. This scientific approach to wall insulation represents a significant advancement in building technology, offering a sustainable solution for modern energy efficiency challenges. Pro Tip: The lower the thermal conductivity value (W/mK), the better the insulation performance. Look for materials below 0.1 W/mK for maximum heat retention. Types of Insulating Plaster and Their Applications Type Key Materials Best For Natural Insulating Plasters Clay-based with straw or hemp Humidity regulation and eco-friendly applications Lime-based Solutions Traditional lime enhanced with cork or perlite Breathability and thermal properties Modern Engineered Systems SprayCork and Diathonite products Advanced thermal and acoustic performance Hybrid Solutions Natural and synthetic combinations Specific applications and climates Key Benefits of Insulating Plaster The advantages of insulating plaster extend far beyond simple thermal insulation. Modern systems can reduce energy consumption by up to 30%, while simultaneously improving indoor air quality and comfort. Energy and Cost Savings: These plasters excel at regulating humidity levels, preventing condensation and mould growth – common issues in British homes. Breathability and Moisture Control: The material’s natural breathability allows walls to manage moisture effectively, creating healthier living spaces. Acoustic Performance: Many variants offer excellent acoustic properties, reducing noise transmission by up to 40 decibels. Space Efficiency: Perhaps most importantly, insulating plaster can be applied without sacrificing valuable floor space, making it an ideal solution for both period properties and modern homes. Installation and Application Process Stage Details Timeframe Surface Preparation Thorough cleaning, assessment, removal of old finishes, repair damages 1-2 days Application Methods Machine spraying or hand trowelling (product dependent) Varies by area Layer Requirements 15-40mm thickness, applied in multiple coats Multiple days Drying Times Between coats 24-48 hours Full Curing Complete hardening and performance optimization 7-28 days Professional Skills Required: Specialist training and experience are essential for optimal results. Best Practices and Common Applications Successful implementation of insulating plaster requires careful consideration of various factors. Interior Walls: The focus should be on achieving uniform coverage and proper thickness to maximise thermal benefits. Exterior Applications: These demand additional attention to weatherproofing and durability. Heritage Buildings: Breathability is crucial to preserve historical fabric. Modern constructions might prioritise thermal performance instead. Our experience shows that proper preparation and application techniques are essential for achieving the best results, whether working on Victorian terraces in Tunbridge Wells or contemporary developments in Bromley. Cost Considerations and ROI Cost Factor Details Initial Investment £25-45 per square metre (varies by system and preparation) Energy Savings 20-30% annual heating cost reduction Property Value Average 15% increase in energy efficiency rating Government Schemes Available grants through Green Homes Grant scheme Payback Period Typically 3-5 years through reduced energy bills Making the Right Choice for Your Property Selecting the appropriate insulating plaster system requires careful evaluation of your property’s specific needs. Key factors to consider include: Building’s age and construction type Existing insulation levels Local climate conditions Wall composition and exposure levels Internal humidity patterns For period properties in Kent, we often recommend breathable lime-based systems that complement original building materials. Modern properties might benefit from high-performance engineered solutions. Professional assessment is crucial to determine the most suitable approach. Pro Tip: Never skip the professional assessment. A proper evaluation of your property’s specific needs will ensure you choose the right system and avoid costly mistakes. Expert Installation and Maintenance Professional installation is crucial for achieving optimal performance from insulating plaster systems. At Kent Plasterers, our certified specialists understand the nuances of different products and application techniques. Minimal Maintenance Required: Regular maintenance typically requires only standard cleaning and occasional checks for damage. Long-Term Durability: Most systems offer excellent durability, lasting 15-20 years or more when properly installed. For best results, we recommend annual inspections to ensure continued performance and address any issues early. Conclusion: Transform Your Home’s Efficiency Insulating plaster represents a significant advancement in home energy efficiency, offering a practical solution for property owners looking to reduce energy costs and improve comfort. With potential savings of up to 30% on heating bills and improved living conditions, it’s an investment worth considering. Contact Kent Plasterers today for a professional consultation and discover how insulating plaster can transform your property’s energy performance while maintaining its character and charm. Sources [1] https://corksoluk.com/help-articles/a-guide-to-plaster-with-thermal-insulation/ [2] https://www.ecologicalbuildingsystems.com/products/insulation-and-materials/plaster-and-screed/insulating-plaster-and-screed [3] https://www.perlite.org/perlite-cement-based-lightweight-insulating-plasters/
Insulating Plaster: Energy-Efficient Homes Guide Read More »