Royal Facade Thermopanels: Advanced Insulated Facade Panels for Superior Energy Efficiency
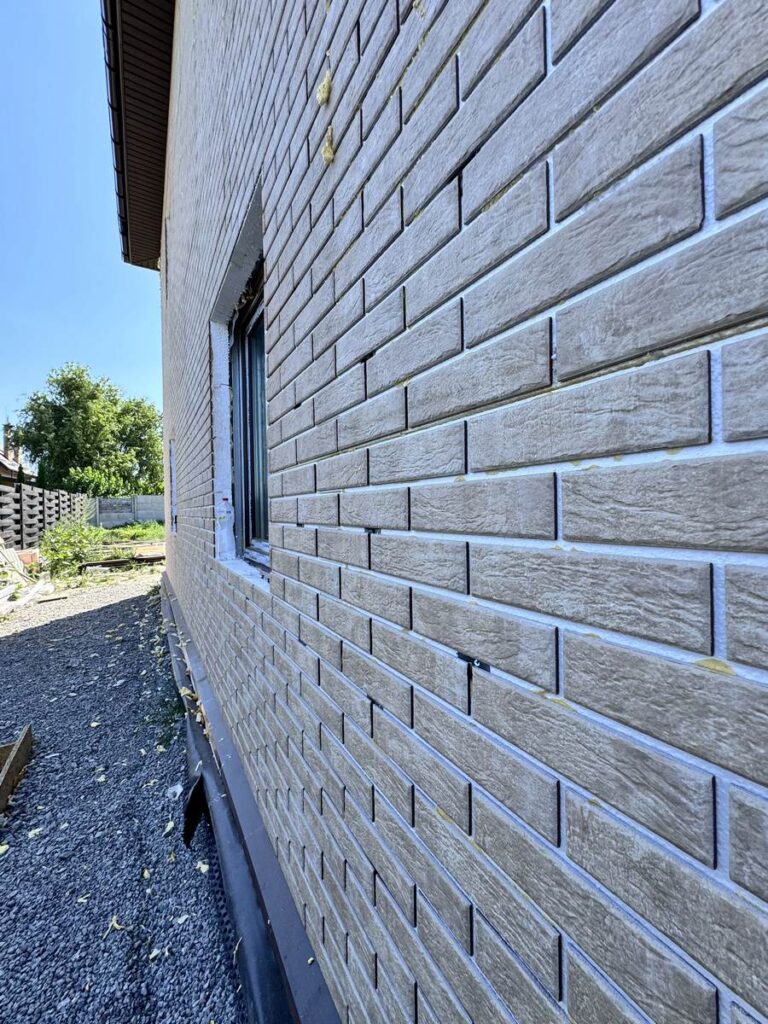
Quick Answer: Royal Facade Insulated Facade Panels combine high-density insulation with authentic clinker tiles to deliver U-values as low as 0.20 W/m²K, reducing heating costs by up to 40%. These advanced thermopanels install 50% faster than traditional systems and come with a 25-year warranty. Royal Facade Insulated Facade Panels represent a revolutionary approach to exterior wall insulation, combining cutting-edge thermal technology with stunning aesthetics. These innovative thermopanels offer property owners in Kent and beyond an exceptional solution for enhancing both energy efficiency and curb appeal. With their advanced clinker thermal insulation system, these panels deliver superior performance that traditional rendering simply cannot match. Understanding the Insulation Technology The core technology behind Royal Facade panels lies in their multi-layered construction. Each panel consists of high-density expanded polystyrene (EPS) or polyurethane foam insulation, bonded with authentic clinker tiles. This sophisticated combination creates an impermeable thermal barrier that significantly reduces heat transfer through external walls. The panels utilise a tongue-and-groove connection system, eliminating thermal bridges that typically compromise insulation effectiveness. This seamless integration ensures consistent thermal performance across the entire facade, achieving U-values as low as 0.20 W/m²K. Key Advantages of Clinker Thermal Insulation Panels Energy Efficiency Benefits Installing Royal Facade panels can reduce heating costs by up to 40%, making them an excellent investment for long-term savings. The superior insulation properties mean your property maintains comfortable temperatures year-round, requiring less energy for both heating and cooling. Weather Resistance and Durability These facade cladding solutions offer exceptional protection against the elements: Complete waterproofing prevents moisture penetration Frost-resistant materials withstand extreme temperatures UV-stable components maintain colour integrity for decades Impact-resistant surface protects against physical damage Installation Efficiency Unlike traditional external insulation systems, Royal Facade panels can be installed quickly and cleanly. The lightweight panels are easy to handle, and the mechanical fixing system eliminates lengthy drying times associated with wet renders. Most projects can be completed 50% faster than conventional methods. Pro Tip: The mechanical fixing system means you can install Royal Facade panels in almost any weather conditions, unlike traditional renders that require specific temperature and humidity levels to cure properly. Design Flexibility and Aesthetic Appeal Royal Facade offers extensive customisation options to complement any architectural style. Choose from various clinker tile colours, textures, and patterns to achieve your desired look. Whether you prefer traditional brick aesthetics or contemporary stone finishes, these panels deliver authentic appearance without the weight and cost of natural materials. Why Choose Royal Facade for Your Property? The combination of thermal performance, durability, and aesthetic versatility makes Royal Facade panels an ideal choice for both residential and commercial properties. The system’s compatibility with various substrates, including brick, concrete, and timber frame constructions, ensures broad application possibilities. Property owners benefit from: Increased property value through improved EPC ratings Reduced maintenance requirements compared to traditional renders 25-year manufacturer warranty for peace of mind Compliance with current building regulations Feature Royal Facade Panels Traditional Render Installation Time 50% faster Standard duration U-Value Performance As low as 0.20 W/m²K Variable, typically higher Energy Cost Reduction Up to 40% Standard savings Warranty Period 25 years Typically 10 years or less Weather-Dependent Installation No – mechanical fixing Yes – requires specific conditions Professional Consultation and Support Every project is unique, and selecting the right insulation solution requires expert guidance. Royal Facade specialists are available for telephone consultations at +48666273099 to discuss your specific requirements and provide tailored recommendations. For comprehensive product information, technical specifications, and installation guidelines, visit https://royalfacade.eu/. Their website features detailed case studies, installation videos, and a gallery showcasing completed projects across Europe. Transform Your Property Today Royal Facade Insulated Facade Panels represent the future of external wall insulation. By combining exceptional thermal performance with stunning aesthetics and long-lasting durability, these innovative panels offer a complete facade solution that delivers real value. Contact the Royal Facade team today to discover how their advanced clinker thermal insulation panels can transform your property while significantly reducing energy costs and environmental impact.